" ශ්‍රී ලාංකීය අභිමානය " ශ්‍රී ලංකාවේ කොල්ලො කෙල්ලොන්ට 2023 සිරාම බ්ලොග් එක.. Blog Eka.. ப்லொக் எக.. "ALLSRILANKANS BLOG"

This is default featured slide 1 title

Go to Blogger edit html and find these sentences.Now replace these sentences with your own descriptions.

This is default featured slide 2 title

Go to Blogger edit html and find these sentences.Now replace these sentences with your own descriptions.

This is default featured slide 3 title

Go to Blogger edit html and find these sentences.Now replace these sentences with your own descriptions.

This is default featured slide 4 title

Go to Blogger edit html and find these sentences.Now replace these sentences with your own descriptions.

This is default featured slide 5 title

Go to Blogger edit html and find these sentences.Now replace these sentences with your own descriptions.

Showing posts with label Mix. Show all posts

Saturday, May 28, 2016

What Are Different Types Of WLAN Authentication — Basics Of Networking


When a wireless network is deployed, authentication is the first thing that needs to be done before connecting it to devices. So, It is important to know the different aspects of the authentication methods. However, authentication should not be mistaken with the authorization. 

Authentication is a process by which the identity of a user is verified by using some sort of credentials. On the other hand, authorization is more like authorizing a person to use the resources. Thus, in the most of the cases, authentication precedes authorization.
As far as authentication is concerned,  there are mainly three types of WLAN authentication methods that are used today:

  • Open authentication
  • shared authentication
  • EAP (Extensible Authentication Protocol) authentication

Open Authentication:

When a wireless network is deployed, a user knows about the particular network using its Service-Set Identifier (SSID). SSID, in simple terms, can be thought of as a wireless network identifier which is continuously broadcasted by the wireless network.

If you are really interested in knowing the different SSIDs your machine can see, then type the command below:

“netsh wlan show networks”

And it would look something like this:


Here, you can see a list of SSIDs as well as authentication types of those SSIDs. So, in the open authentication, if the device knows the SSID, it can directly join the network.

Shared Authentication:

The shared authentication method is more secure than the open authentication. However, the shared authentication is basically employed on the individual and small business levels. A shared key, also known as Pre-Shared Key (PSK), is shared between the two parties. When the device tries to connect to that network, it puts in the key and if that matches, then the device is allowed onto the network.

Extensible Authentication Protocol (EAP):

EAP is the last types of WLAN authentication method, but the most secure authentication process of all. That’s why EAP is also deployed at the enterprise level along with an authentication server. A user logs into the wireless network using a variety of credential options.

Share:

Monday, May 2, 2016

ඇපලයේ වගතුග 40 years of Apple - in pictures


ඔන්න මම අද අරන් ආවේ අපි කවුරුත් දාන්න කියන රහ බලලා තියන ඇපල් ගැන පොඩ්ඩක් මතක් කරලා දෙන්න ඉතින් ඇපල් සමාගමේ මුල්ම  පරිගනකයේ සිට ඇපල් ඔරෝලොසුව දක්වා එයාලගේ සියලුම නිර්මාණ වල එකතුවක් මෙන්න අද මගෙන් මතකය ආවර්ජනය කිරීමක් .

From the first Apple computer, Steve Jobs leaving and returning, the iMac and the MacBook Air to the iPod, iPhone, iPad and Watch, Apple’s is a rich history

Apple Inc., formerly Apple Computer, Inc., is a multinational corporation that creates consumer electronics, personal computers, servers, and computer software, and is a digital distributor of media content. The company also has a chain of retail stores known as Apple Stores. Apple's core product lines are the iPhone smart phone, iPad tablet computer, iPod portable media players, and Macintosh computer line. Founders Steve Jobs and Steve Wozniak created Apple Computer on April 1, 1976,[1] and incorporated the company on January 3, 1977,[2] in Cupertino, California.


Share:

Sunday, August 9, 2015

Everything You Need to Disable in Windows 10


Windows 10 is the most cloud-oriented version of Windows to date—yet, while this means you get some nifty new features, it also means some of your personal data is being shared with Microsoft's servers.

In all fairness to Microsoft, this type of behavior has become commonplace amongst tech companies across the world—but that doesn't mean we should sit idly by. Additionally, some of these features can cost you battery life and performance, so I'll show you how to disable them all below.

Disable Wi-Fi Sense

The first questionable Windows 10 feature I'd like to talk about is called "Wi-Fi Sense." Microsoft enabled this feature by default, and to summarize, your network passwords are now being shared with your social media friends automatically. It's a 2-way street, so the convenience factor is definitely appealing—no more asking for your friend's Wi-Fi password, and no more issues conveying your own complicated password to your friends.

Wi-Fi Sense does not share passwords automatically—while it's enabled by default (so you can access shared passwords), you have to explicitly choose what passwords to share. None are shared without you explicitly choosing to share them. But, the passwords are securely stored on Microsoft's servers and obfuscated when shared, but that's just it—it's my password, and I never wanted Microsoft to have it in the first place.

So if you'd like to disable Wi-Fi Sense, open your Start menu and launch the Settings app. From here, choose the "Network & Internet" option to begin.


 Next, click the "Manage Wi-Fi settings" option on the following page.


From here, the Wi-Fi Sense options will be displayed at the top of the screen. Basically, you want to disable every last option in this menu.


At this point, you'll no longer be participating in Microsoft's Wi-Fi sharing program, but your passwords may still be stored remotely. To disable Wi-Fi Sense altogether, you'll have to add a suffix of "_optout" to the end of your Wi-Fi network's name (SSID) through your router's settings menu.

Disable Bandwidth Sharing for Updates

In another strange act of opt-out data sharing between users, Windows now uses a sort-of peer-to-peer network for downloading updates. Similar to a torrent program, this means that when you download a Windows update file, you're also uploading parts of it to other users.

Since unnecessary bandwidth usage can be costly, you'll probably want to disable this one. Again, start by heading to the Settings menu, but this time open the "Update & Security" section.


From the "Windows Update" tab on the next screen, click the "Advanced options" button to find the setting we're looking for.


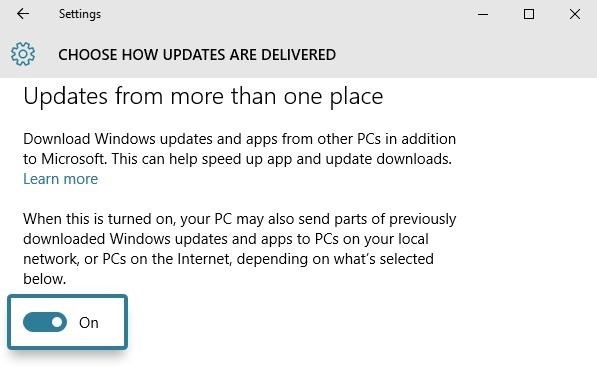
Next, scroll down to the bottom of this page, then select the option labeled "Choose how updates are delivered."

Finally, turn off the toggle switch directly beneath the excerpt about "Updates from more than one place." They really buried this one deep, didn't they?


Disable Automatically-Applied Updates

On the subject of updates, Windows 10 now automatically applies updates by default, which is a nice feature on the surface. The downside here, though, is that while they say it'll only restart your device while you're not using it, I can personally attest that this is not always true.

So if you don't want to run the risk of losing unsaved data when Windows decides it needs to update itself, head to Settings, then Update & Security, and select the "Advanced options" entry again. From here, click the drop-down menu directly beneath the "Choose how updates are installed" header.


Finally, set this option to "Notify to schedule restart." This will ensure that Windows at least gives you a warning before restarting itself to apply updates.


If you experience any issues with Windows restarting multiple times in an attempt to apply the same broken update,

Disable 'Getting to Know You' Features

Another disturbing feature that is meant to streamline your Windows 10 experience is called "Getting to know you." This one logs your typing history, saves recordings of your voice, collects information from your contacts, calendar, and even your handwriting—all in the name of giving you a more personalized experience with Cortana.

In addition to options for the "Getting to know you" feature, each of these last 4 sections will be dealing with options in Windows 10's Privacy menu—so open your Start menu and launch the Settings app, then select "Privacy" to begin.


From here, select the "Speech, inking & typing" category in the left-hand menu, then click "Stop getting to know me" to take back a bit of privacy.


Disable Targeted Ads

With Windows 10, you've now been issued a unique advertising ID to help "serve" you with more targeted ads. This ID cannot be removed permanently, but at the very least, you can prevent 3rd-party apps from accessing this data.

To begin, head to the "General" tab in Windows 10's Privacy menu. From here, make sure to disable the topmost toggle switch, labeled "Let apps use my advertising ID for experiences across apps."


Disabling this setting won't affect Windows apps like Microsoft Edge, so you may want to take this a step further. To disable targeted ads in Edge, use the browser to navigate to this link, then turn any available options off.

Prevent App-Access to Your Location, Microphone, & Webcam

In Windows 10, third-party apps can access your microphone, webcam, and location. While this makes sense for some apps—for instance, a video-chatting app needing access to your microphone and webcam—not all apps absolutely need these permissions. Additionally, apps accessing your location too frequently can lead to a reduction in performance and battery life, so you should at least familiarize yourself with these menus.

First up, head to the "Location" tab in the Privacy menu, then scroll down to the bottom of the page to review the apps that have permission to access your location. To block any of these apps from accessing your location, simply toggle the adjacent switch to "Off."


In the same vein, head to the "Camera" tab to check on apps that can access your webcam. Again, scroll down to the bottom of the list, then turn off the toggle switches next to any unnecessary apps in this list.


Finally, head to the "Microphone" tab in the Privacy menu to view apps that can access your microphone. Again, simply turn off any switches here if you don't want an app to access your microphone.


Disable Unwanted Background Apps

This last option is a bit less privacy-oriented, but it can make a big impact in terms of battery life and performance. Many "Universal" Windows apps are set to start up alongside your computer, and this is a drain on your computer's resources.

From the Privacy menu again, scroll down to the bottom of the menu on the left side of the page, then select the "Background apps" option. From here, simply use the toggle switches to prevent these apps from running on startup and staying open in the background.


Share:

Wednesday, August 5, 2015

මුසිකය විසික් කර මුහුණ කරකවමුද? Mouse Control With Face ...


ඔන්න මම ආයෙමත් ආවේ පට්ට වැඩ කෑල්ලක් හොයාගෙන. මේ ඇවිල්ලා අපි පරිගණකය ඉස්සරහට ආවම කාටත් නැතුවම බැරි මවුස් එක විසික් කරලා අපේ මුනෙන්ම ක්ර්සර් එක එහා මෙහා යවන්න පලුවන් විදියක් ගැන ආ. හරි එහෙනම් අපි වැඩේට බහිමුකො.

හා මුලින්ම කියන්නම ඕනේ මේක පාවිච්චි කරන්න ඔයාලට වෙබ් කැම් එකක් තියෙන්නම ඕනේ. ඒ වගේම මේක හදල තියෙන්නේ අත පය හොලවන්න බැරි  අයට කියලත් මතක තියා ගන්න. 

හරි එහෙනම් මේක මුලින්ම ඔයාලා ඩවුන් කරගෙන සෙටප් කර ගන්න. එට පස්සේ තමන්ට ඕනේ විදියට සෙටින්ග්ස් හදාගෙන යුස් කරන්න පුළුවන්.  

About
Camera Mouse was invented at Boston College to help people with disabilities use the computer. We make it available for free download, with no gimmicks or advertisements or registration, because we want to help as many people as possible.


තව විස්තර තියනවා මෙන්න මේ වීඩියෝ එකෙත් . එකත් බලලම යන එහෙනම් කස්ටිය ආ. බයි බායි ... 

Share:

Saturday, December 27, 2014

ඔයාගේ නෙට් එකේ Speed එක බලගමුද? Internet

Online Internet Speed Checker

Other Sites මෙන්න තවත් සයිට්

Share:

Thursday, August 16, 2012

වේගෙන් වැඩ කරන්න අපිට අවශ්‍ය වන Keyboard කෙටි මන් ටික


හායි යාලුවනේ ඔන්න මම අද ආයෙමත් ආවා. දැන් මම කියන්න යන්නේ අපිට නිතරම ඕනේ වෙන එහෙමත් නැත්නම් අපේ වැඩ ලේසියෙන්ම කර ගන්න පුළුවන් පරිගණක යතුරු පුවරු කෙටි මන් ටිකක්. එහෙමත් නැත්තම් Keyboard Shortcut ටිකක්. ටිකක් කිව්වට මම අද අපිට නිතරම ඕනේ වෙන ප්‍රදාන කෙටිමං 10 ගැන කියන්න තමයි යන්නේ.

හරි ඒ වගේම කියන්න ඕනේ මට මේක හම්බුන තැනින් කොපි කරලා තමයි ඔයාලට දෙන්නේ ඒ කියන්නේ මම ඒක English වලින්ම තමයි ඔයාලට දෙන්නේ. ඒ උනාට බය වෙන්න එපා ඒක තේරුන් ගන්න අමාරු නෑ. සරල ඉංග්‍රීසි වලින් තියෙන්නේ. මෙන්න එහෙනම් පල්ලෙහා තියනවා සීන් එක. ඒක ඉස්සෙල්ලා බලලා ඉන්නකෝ.

1. CTRL + C or CTRL + Insert


Ctrl + C will automatically copy the highlighted text whilst CTRL + Insert would copy    the highlighted/ selected item such as picture or code.

2. CTRL + V or Shift +Insert

CTRL + V will paste text that you have copied and is present in your clipboard. If you have copied some object other than text, then Shift + Insert is the shortcut for you.

3. CRTL + Z and CTRL + Y

CTRL + Z will undo any change that you have made recently while the CTRL + Y combo will redo any change which was made recently. CTRL + Y is basically the opposite for undo.

4.CTRL + F

Ctrl + F is the combination for everyone who wishes to find a particular keyword or  search term in the content.


5. SHIFT + F3

When you apply the above mentioned combination, it will automatically turn all the capitalized text into lowercase.

6. SHIFT + DELETE

Shift + Delete is the perfect combination for deleting a file. When you opt for Shift + Delete for deleting a file, then it gets immediately deleted completely without having the need to remove it from the recycle bin.


7. ALT + TAB

ALT + TAB is the shortcut for switching amongst windows.  What it basically does is, brings up a window with a list of icons representing programs which are at present     running on your PC


8. CTRL + ALT + DELETE

The combination of Ctrl, Alt and Delete brings up the Task manger for all the processes going on at the present moment. Using the task manager you can have a look at all the processes which are currently going on in your system and end those which are unnecessary.


9. Ctrl + S

Whilst working on a document, this combination saves you time to go over to the file tab and choosing save. Once used, this combination saves the document instantly.

10. Page Up/Down + Space bar

Pressing the combination shifts the page one at a time, in the specified direction. When Page Up + Space bar, you will move upwards at the speed of 1 page at a time and vice versa

හරි එහෙනම් යාලුවනේ මම දැනට නවතිනවා අයෙමත් ඉක්මනින්ම හමු වෙමු.

Share:

අපේ ලිපි කෙලින්ම Email එකට

Enter your email address:

Delivered by FeedBurner


මුහුණ පොතේ අපි

පැමිණ ගිය අය

අපේ යාලුවෝ