" ශ්‍රී ලාංකීය අභිමානය " ශ්‍රී ලංකාවේ කොල්ලො කෙල්ලොන්ට 2023 සිරාම බ්ලොග් එක.. Blog Eka.. ப்லொக் எக.. "ALLSRILANKANS BLOG"

This is default featured slide 1 title

Go to Blogger edit html and find these sentences.Now replace these sentences with your own descriptions.

This is default featured slide 2 title

Go to Blogger edit html and find these sentences.Now replace these sentences with your own descriptions.

This is default featured slide 3 title

Go to Blogger edit html and find these sentences.Now replace these sentences with your own descriptions.

This is default featured slide 4 title

Go to Blogger edit html and find these sentences.Now replace these sentences with your own descriptions.

This is default featured slide 5 title

Go to Blogger edit html and find these sentences.Now replace these sentences with your own descriptions.

Showing posts with label Windows 10. Show all posts

Wednesday, June 21, 2017

කරමුද හැක් පාරක් ඩොස් වලින් හික් ගෑවෙන්න - Best CMD Commands Used in HACKING


Networking ගැන ඉගෙන ගන්න අයට  ඉගෙන ගන්න ඉන්න අයට   වැදගත් වෙන post  එකක් තමා මම අද දාන්නේ , network  එකක් ඇතුලේ සිද්ද වෙන දේවල්  මේ Commands වලින් බලා ගන්න පුළුවන් , Network  එකේ විස්තර අපිට දැන  ගන්න පුළුවන් ඒවා දැන  ගත්තම තමා hack  කරන්නත් පුළුවන් වෙන්නේ , hack  කරන එක ලේසි නැහැ, එත් බැරිත් නැහැ එකට ලොකු දැනුමක් , working  experience  එකක් ඕනේ. මේ coads  hack  කරන අය  use  කරන basic  commands  ටිකක්


nslookup
net view
net use
net user
ping
tracert
arp
route
nbtstat
netstat
ipconfig


අපි Commands  කීපයක් බලමු , ඉතුරු ටික Google  කරලා හොයල බලන්න  :)


nslookup 

මේ command  එකෙන් තමා ඔයා නොදන්නා IP  එකක් හොයා ගන්නේ ,eg:- lets think you dont know what is facebook ip ? so bn ubata pluwan just type this Command in CMD like this ,

nslookup  facebook.com   මේක CMD  එකේ type  කරලා Result  එක බලන්න ..


ipconfig

මේකෙන් පුළුවන් ඔයාගේ IP  එක ඇතුළුව ඔයාගේ MAC  ඒ හැමදේම බල ගන්න ...

arp

මේකෙන් පුළුවන් MAC  Adress  Table  එක බලා ගන්න 

route

මේ Command  එකෙන් Routing  Table  එක බලන්න පුළුවන් 

netstat 

net  Connaction  States  එක මේකෙන් බලාගන්න පුළුවන් 

මෙන්න මේ වගේ වැඩ තමා මේවගෙන් වෙන්නේ ඉතින් මේවා  වැඩ කරන්න නම් ඔය CMD එක RUN  as  Administrator  දෙන්න ඕනේ ! ජය  !!!

උපුටා ගත්තේ : ginilihiniya

Share:

Friday, December 9, 2016

Automatically Hide Desktop Icons In Windows XP/7/8/10


AutoHideDesktopIcons

AutoHideDesktopIcons is a free and portable utility designed to automatically hide desktop icons when they are not being used. The AutoHideDesktopIcons utility allows you configure how much time must elapse after moving the mouse cursor away from desktop or mouse idle time on desktop before the program automatically hides desktop icons.


Automatically hide desktop icons

With default settings, AutoHideDesktopIcons automatically hides desktop icons if you move the mouse cursor away from desktop for 5 seconds but you can change it.

To see hidden icons, you can simply left-click, right-click or middle-click on desktop.

In short, when you move the mouse cursor away from desktop to another window or taskbar area or when the mouse cursor on desktop is idle for specified time, the AutoHideDesktopIcons program kicks in and hides all desktop icons. You can make these icons visible by performing a middle, left-click or right-click on desktop.

There is even an option to show desktop icons when you move the mouse cursor moves across the desktop area. Click More options button to see this option.


In addition to desktop icons, the program can also automatically hide the taskbar if the above conditions are met. The ability to hide taskbar is turned off by default but you can turn it on by checking Hide taskbar option under program preferences.

If you like this little program, we recommend you configure it to start with Windows by checking Start with Windows option under preferences. When the AutoHideDesktopIcons is running, click the To-Tray button to move the program to system tray.


The AutoHideDesktopIcons program is compatible with Windows 10, Windows 8/8.1, and Windows 7, both 32-bit and 64-bit systems. Windows 10 might warn against running this program but you can safely run the program by clicking the Options link and then clicking Run anyway button.


For Download Use Following Links 

For Windows 7 / 8 / 10


For Windows XP
Share:

Thursday, December 8, 2016

WhatsApp Will Stop Running On These Smartphones In 2017


The company has updated its official blog post that recommended upgrading to a newer Android, iPhone, or Windows Phone version to continue using WhatsApp.

WhatsApp won’t work on these devices after June 30, 2017:

  1. Android 2.1 and Android 2.2
  2. Nokia S40
  3. Nokia Symbian S60
  4. BlackBerry OS and BlackBerry 10
  5. iPhone 3GS/iOS 6
  6. Windows Phone 7


It looks like WhatsApp is taking these steps as these older platforms hinder the growth of the app by not supporting the newer features.

“While these mobile devices have been an important part of our story, they don’t offer the kind of capabilities we need to expand our app’s features in the future,” the company adds in its blog post.
Share:

Wednesday, December 7, 2016

How To Find Installation Date Of Our Windows And Linux PC "OS"


Finding Installation Date and Uptime in Windows PC

Finding the uptime in a Windows PC is very easy and many of you might be knowing this method. It simply involves opening the Task Manager and navigating to the Performance tab.

There, under the CPU tab, you’ll find the uptime stat of your Windows PC in the Days:HH:MM:SS format.


To find the installation date of a Windows computer, you need to open the Command Prompt. To do this, either execute CMD command in the Run window or press Win+R key.

Now, run the following command on Windows 10 and Windows 8 to find the installation date of your operating system:

systeminfo | find /i “Original”

For Windows 7 operating system, your need to run the following command:

systeminfo | find /i “install date”

Finding installation date and uptime in Linux PC

Just like Windows, finding the installation date and uptime in your Linux PC is any also an easy task. To find the uptime in Linux, simply open the terminal and run the following command. I ran this on my Ubuntu 16.10 system and it should also work on other distributions as well.

uptime

To find the installation date in Linux, you need to find a file, folder, or log that was created during the installation time. One such file can be accessed by running the following command. This makes it easy to spot the installation date of your Linux-based operating system.

ls -l /var/log/installer
Share:

Tuesday, October 25, 2016

How To Rotate Images In Windows 10 File Explorer


How To Rotate Images In Windows 10 File Explorer

If you have one or more picture files in one of the folders on your Windows 10 PC, you can rotate clockwise or anti-clockwise with ease. The good thing is that you can even use keyboard shortcuts to quickly rotate picture files.

Follow the directions in given below methods to easily rotate pictures in Windows File Explorer.

Method 1 of 3

Rotate images in Windows 10 File Explorer

Step 1: Open up File Explorer (Windows Explorer) and navigate to the folder containing picture files.

Step 2: Select an image that you want to rotate by clicking on it.

Note: You can rotate multiple pictures at once using this method. To do so, please select all picture that you want to rotate and then proceed to the next step.

Step 3: Click the Manage tab and then click Rotate left or Rotate right button to rotate the selected picture file. That’s it!

Method 2 of 3

Rotate images using keyboard shortcuts

And if you prefer to use keyboard shortcuts to rotate pictures, after selecting picture files that you want to rotate, press Alt key, press JP, press RL to rotate left and press RR to rotate right.

Method 3 of 3

Rotate images using right-click context menu

Step 1: Select picture file(s) you want to rotate.

Step 2: Right-click and then click Rotate right or Rotate left option.
Share:

Monday, October 24, 2016

Windows Command Line මෙන්න හැමෝටම ඩොස් කමාන්ඩ්ස්


Windows CMD commands - Windows native commands

At                    Schedule tasks
Attrib            Set file attributes
Bootcfg            Enable kernel debugging
copy                 Copy files
Compact            Compress or decompress files and directories
Echo            Echo the command/contents of a file
Date                    Set system date and time
Del                    Delete files
Dir                    List files and directories
Eventquery.vbs  View events
find                    Search files for a given string
findstr            Search files for a given string; Has advanced options than find command.
for                    Windows batch command for looping
getmac            Find mac address of the system
hostname            Get system name
logoff            Logoff user session
Mkdir            Create directories
More            More command. Similar to Linux more command
Net user            Manage user accounts
Net use            Create/List/Delete network drives
Net localgroup   Manage local computer’s user groups
Net share            Create / List/ Delete shares on the local computer
Reg                    Edit/create/delete registry keys
Rename            Rename files
Rename            Rename directories
Rmdir            Delete directories
Robocopy    Copy large number of files/folders
Runas            Run an application as a different user in the same session
Schtasks            Schedule tasks
Shutdown    Shutdown computer
Shutdown    Shutdown remote computer
Sort:                    Command for sorting text files
Systeminfo    Get computer information
Tasklist            List processes
Taskkill            Kill processes
Type Cat             Command for Windows. Prints the contents of file on command window
Xcopy                Copy files and directories

Resource Kit Tools

Compress    Compress a file
Srvinfo            Get remote system information
tail                    Print the last lines of a file
Ver                    Get Windows OS version

PsShutdown.exe Shutdown remote computer

Share:

Monday, May 16, 2016

How To Remove Virus From USB Or Any Drive On Windows 10 Using CMD


Most of the viruses modify the attributes of a file or a folder such that they become very hard to access. Some of the attributes that are changed in a file or a folder are the read, write or the execute permission on that file. Using ‘attrib’, one of the cmd commands, we can try our hands to change the attributes of a file and reset the file’s internal structure in order to recover a file.

How is a virus different from any other file on Windows? A virus can be present in your system as a file format which has the following properties:


  1. A virus can be a file hidden from a user
  2. A virus can be present in the form of an ‘autorun’ or ‘Autoexec’ file
  3. A virus can be an exec file
  4. A virus can be a file with different attribute permissions

Some of the well-known examples of the above kinds of the viruses are:

  1. Autorun.inf
  2. Ravmon.exe
  3. New Folder.exe
  4. svchost.exe
  5. Heap41a

Remove Virus Using CMD from USB/ any Drive on Windows 10:

In order to remove a virus using cmd, we will use a famous cmd command called ‘attrib‘ command.

It can be easily guessed from its name that the ‘attrib’ command represents different attributes of a file, folder or a directory. This command is mainly responsible for displaying, setting and removing the different attributes like read-only, archive, system, and hidden attributes of a file or folder.

Using this command, we will try to change the attributes assigned to a file and thus recover our file.

Here are the basic attributes of the ‘attrib’ command which we will use later:

  • R – R represents the “Read-only” attribute of a file or folder. Read-only means the file cannot be written or executed.
  • H – H stands for the “Hidden” attribute.
  • A – Similarily,  A stands for “Archiving” which prepares a file for archiving and,
  • S – S attribute changes the selected files or folders into a system file from a user file by assigning the “System” attribute to that particular file.

“attrib” Syntax:

ATTRIB [+ attribute | – attribute] [pathname] [/S [/D]]

In the above command, let’s see what the different parameters and switches are:

‘+ / –’ : To enact or to cancel the specified attribute.
‘attribute’ : As explained above
‘/S‘ : Searching throughout the entire path including subfolders
‘/D’ :  Include any process folder
‘pathname’ : Path where the target file or folder is located.

Here is the proper syntax for attrib command:

ATTRIB [+R | -R] [+A | -A ] [+S | -S] [+H | -H] [+I | -I] [drive:][path][filename] [/S [/D] [/L]]

Let’s get started:

I am going to transfer an ‘autorun.inf‘ virus from my USB drive to my D: drive and delete that virus from my D: drive.

  • Run command prompt as an administrator

  • Since the autorun.inf virus is in my D: drive, I am going to change the drive to D: drive. It can be done by typing D: and press enter.

  • type attrib and press enter. This command will list out all the files inside the current drive and you can clearly see the autorun.info virus listed below.


  • To remove Virus using CMD, type into your command prompt attrib -r -a -s -h *.* and press Enter. This will remove the Read Only, Archive, System and hidden file attribute from all the files.
    • -r is for removing the read-only files
    • -a is for removing the archive file
    • -s is for removing the system file
    • -h is for removing the hidden file
    • *.* for all the files with all different types of file extensions\\

  • Note that this command will only remove the different attributes from different files. However, the files will still be there. Now time has come to delete the virus. So, to delete the virus, type del autorun.inf and enter

  • Once you have pressed enter, that file should get deleted from the current drive. In case, you want to delete that file from a USB stick, then you can change your current drive to USB drive current drive in step 2 and follow the commands.
  • You can again type ‘attrib’ command to see if the deleted file exists or not. As seen above, it does not exist anymore in the D drive.
  • To remove other viruses with extensions such as ‘.ink’, ‘.exe’, just type Del *.ink or Del *.exe respectively to delete those suspicious files.
I hope this would have been informative for you. If you know some other tricks, let us know in the comments below.
Share:

Saturday, May 7, 2016

අවසාන දැනුම් දීමයි ආයේ කියන්නේ නෑ MICROSOFT NEWS


අවසාන දැනුම් දීමයි ආයේ කියන්නේ නෑ MICROSOFT NEWS ඔන්න කිව්වා ආයෙමත් ,, මේකයි කතාව ඔයාලා වින්ඩෝස් භාවිතා කරන කට්ටිය නම් දන්නවා ඇතිනේ වින් 10 එක අපිට දුන්නේ නොමිලේ කියලා ඒ කියන්නේ කලින් භාවිතා කල වින්ඩෝස් උඩින් මේක දා ගන්න අපිට නොමිලේ හම්බුනා. ඔන්න මේ මැයි ලබන කොටම මෙයාලා තීරණයක් අරං මේක ෆ්‍රී දෙන එක නතර කරන්න. 

Reminder: Windows 10 Free Upgrade Offer To End On July 29, Will Cost $119

මෙන්න කතාව අපිට ජුලි 29 වෙනකන් විතරයි මේක කරගන්න පුළුවන් එහෙම නොවුනොත් ඉතින් සල්ලි දීල ගන්න වෙයි. මෙන්න තවත් විස්තර.

Anyone who has been holding off upgrading to Windows 10 might want to rethink that decision fairly soon, with Microsoft now reminding the world that those who want to get their hands on a free upgrade will need to do so fairly sharpish. As the first birthday of Windows 10, and the accompanying Anniversary Update, draws ever closer, Microsoft is seeking to remind us all that July 29th will be the last possible date during which a free upgrade of Windows 10 will be available.


Microsoft’s decision to offer a free upgrade to Windows 10 was initially said to be valid for a year, and with Microsoft good to its word, July 29th is a day that those running older versions of Windows may wish to mark on their calendars. Things start to get expensive the day after that too, with Microsoft set to start asking for $119 in exchange for a fresh Windows 10 update key come July 30th.

In the video embedded below, Microsoft’s Bryan Roper discusses 10 reasons to upgrade to Windows 10 today. වින් 10 ගැන තවත් විස්තර මේ වීඩියොවෙන්...


Share:

Wednesday, May 4, 2016

How To Install Lubuntu 16.04 Alongside Windows 10


Introduction

In this guide I will show you how to dual boot the latest Lubuntu 16.04 release alongside Windows 10 on a machine with an EFI boot loader.

1.  Take A Backup

Before installing Lubuntu alongside Windows it is a good idea to take a backup of your computer so that you can get back to where you are now should the installation fail.

2.  Shrink Your Windows Partition


In order to install Lubuntu alongside Windows you will need to shrink the Windows partition as it will currently take up the entire disk.

Right click on the start button and choose "Disk Management"

The disk management tool will show you an overview of the partitions on your hard drive.

Your system will have an EFI partition, a C drive and possibly a number of other partitions.

Right click on the C drive and choose "Shrink Volume".

A window will appear showing how much you can shrink the C drive by.

Lubuntu only needs a small amount of disk space and you can get away with as little as 10 gigabytes but if you have the space I recommend choosing at least 50 gigabytes.

The disk management screen shows the amount you can shrink by in megabytes so in order to choose 50 gigabytes you need to enter 50000.

Warning: Do not shrink by more than the amount suggested by the disk management tool as you will break Windows.

When you are ready click "Shrink".

You will now see unallocated space available.

3.  Create A Lubuntu USB Drive And Boot Into Lubuntu


You will now need to create a Lubuntu live USB drive.

In order to do this you will need to download Lubuntu from their website, install the Win32 disk imaging tool and burn the ISO to the USB drive.

4.  Choose Your Language


When you reach the Lubuntu live environment double click on the icon to install Lubuntu.

The first thing you need to do is choose your installation language from the list on the left.

Click "Continue".

You will now be asked whether you want to download updates and whether you want to install third party tools.

I generally keep both of these unticked and perform the updates and install third party tools at the end.

Click "Continue".

5.  Choose Where To Install Lubuntu


The Lubuntu installer should have picked up on the fact that you have Windows installed already and so you should be able to choose the option to install Lubuntu alongside Windows Boot Manager.

This will create 2 partitions in the unallocated space created when you shrank Windows.

The first partition will be used for Lubuntu and the second will be used for swap space.

Click "Install Now" and a message will appear showing which partitions are going to be created.

Click "Continue".

6.  Select Your Location


If you are lucky your location will have been automatically detected.

If it hasn't choose your location on the map provided.

Click "Continue".

7.  Select Your Keyboard Layout


The Lubuntu installer will hopefully have chosen the best keyboard layout for your computer.

If it hasn't choose the keyboard language from the left list and then the layout in the right pane.

Click "Continue".

8.  Create A User


You can now create a user for the computer.

Enter your name and a name for your computer.

Finally pick a username and enter a password for the user.

You will need to confirm the password.

You can choose to login automatically (not recommended) or require a password to log in.

You can also choose whether to encrypt your home folder.

Click "Continue".

9.  Complete The Installation


The files will now be copied to your computer and Lubuntu will be installed.

When the process has finished you will be asked whether you want to continue testing or whether you want to restart.

Choose the continue testing option

10.  Change The UEFI Boot Sequence


The Lubuntu installer doesn't always get the installation of the boot loader correct and therefore you may find that if you restarted without following these steps that Windows continues to boot with no signs of Lubuntu anywhere.

Follow this guide to reset the EFI Boot Order

You will need to open a terminal window in order to follow this guide. (Press CTRL, ALT and T)

You can skip the part about installing efibootmgr as it comes preinstalled as part of the live version of Lubuntu.

After you have reset the boot order, restart your computer and remove the USB drive.

A menu should appear every time you boot your computer. There should be an option for Lubuntu (although it might be called Ubuntu) and an option for Windows Boot Manager (which is Windows).

Try both options and make sure they load correctly.
Share:

Saturday, April 30, 2016

මයික්‍රොසොෆ්ට් එකට පිස්සු යකොව් . මෙන්න නොමිලේ ෆෝන් -FREE MICROSOFT PHONE-


මයික්‍රොසොෆ්ට් එකට පිස්සු යකොව් මයික්‍රොසොෆ්ට් එකට පිස්සු හි හි අවුල් ගන්න එපා මේකයි කතාව දැන් මයික්‍රොසොෆ්ට් එකට තියන ලොකුම ප්‍රශ්නය තමයි මේ මොබයිල් ෆෝන් කේස් එක ඉතින් ඒක නිසා මෙන්න මෙයාලා මෙයාලගේ අලුත්ම ෆෝන් එක ගන්න 950XL කොට නොමිලේ තවත් 950 ක් දෙනවා ඒකයි පිස්සු කිව්වේ . ලෝකයා මේක ගැන කියන්නේ මෙන්න මේ විදියට ..හැබැයි ඉතින් මේක වලංගු ඇමරිකාවට විතරයි හොඳේ .

It’s not hidden that Windows Phone is one of the most troubled parts of Microsoft’s business. The company has been trying to push the platform for many years and failing repeatedly. As a part of its latest promotional offer, the company is giving away a free Lumia 950 if you buy a Lumia 950 XL before May 1.

Share:

Thursday, April 28, 2016

මරණින් පසු ඔබේ Facebook ගිණුම කාටද ? මෙන්න උත්තරේ !


මුලින්ම කියන්න ඕනේ මේක හිරු සයිට් එකෙන් උපුටා ගත් එකක් මගේ බ්ලොගයේ යාලුවන්ටත් බලන්න මම දැම්මේ. ලින්ක් එක පල්ලෙහා තියනවා . 

ෆේස්බුක් කියන දේ මේ වෙනවිට ලෝකේ හැම දෙනෙක් අතරම ප්‍රසිද්ධයට පත්වෙලා ඉවරයි.  ඒ කියන්නේ ෆේස්බුක් ගිණුමක් නැති කෙනෙක් මේ වෙනකොට හොයාගන්නත් අමාරුයි. තමන්ගේ යාළුවෝ වගේම නෑදෑයෝ එක්ක විතරක් නෙවෙයි ෆේස්බුක් එකෙන්ම අලුතින්ම මුණගැහුණු අය එක්ක ගොඩ දෙනෙක් ඒ ඔස්සේ සම්බන්දකම් පවත්වනවා.  ඔවුන් එක්ක ඡායාරූප, වීඩියෝ ශෙයාර් කරගන්නවා, සමහර අවස්ථාවල පෙම්වතුන් වෙලා ඉන්නවානම් පැය ගණන් දවස් ගණන් චැට් කරනවා.

හැබැයි මේ හැමදේම අතරේ අපි කවදාහරි දවසක මේ ලෝකේ දාලා යනවා. එදාට අපේ ෆේස්බුක් ගිණුමට මොනවා වෙයිද ? මේ ගැන ඔබ කලින් හිතන්න නැතුව ඇති. හැබයි ඒ ගැන මේ වෙනකොට ෆේස්බුක් සමාගම හිතලා තියෙනවා.

ඔවුන් හඳුන්වාදෙන අලුත්ම විශේෂාංග තමයි ෆේස්බුක් ගිණුම් හිමියෙක් මියගියාට පස්සේ ඔහුගේ ගිණුමට වෙන දේ ගැන ඔහුට මියයන්නට ප්‍රථමයෙන් තීරණය කරන්න පුලුවන් අවස්ථාවක් උදාකරලා දෙන එක.

ඒ අනුව තමන්ගේ ගිණුම මරණයෙන් පසුව වෙනත් අයෙකුට පැවරීමේ හැකියාව තිබෙන බවයි ඔවුන් පවසන්නේ. නමුත් පවරන පුද්ගලයාට එම ගිණුමේ භාවිතා කල හැකිවන්නේ සීමා සහිතවයි. මියගිය පුද්ගලයාගේ පෞද්ගලික පණිවුඩ ඔහුට නැරඹීමේ හැකියාව නොමැති අතර Profile Pictures, Cover Photos වෙනස් කිරීමේ හැකියාව ඔහුට පවතිනවා. 

ඒ වගේම අවශ්‍යනම් මරණයෙන් පසුව තමන්ගේ ගිණුම අක්‍රීය කිරීමේ හැකියාවද මෙහිදී ඇතුලත් වෙනවා. නමුත් එය අක්‍රීය කිරීමට නම් ඔහු මියගිය බවට ෆේස්බුක් වෙත වෙනත් අයෙක් විසින් දැන්විය යුතු වෙනවා.  ඒ වගේම තමන්ගේ Facebok wall එක වෙනත් අයට එහි පණිවුඩ පලකල නොහැකි ලෙස සකසා ඇත්නම් මරණින් පසුව එය Unlock කර ඔහුගේ මරණය වෙනුවෙන් එහි ශෝකය පළකිරීමේ හැකියාවද මෙම නව විශේෂාංගය මඟින් හඳුන්වාදීමට ෆේස්බුක් සමාගම කටයුතු කරමින් සිටින බවයි විදෙස් මාධ්‍ය වැඩිදුරටත් වාර්තා කරන්නේ.

මෙය ඔබගේ ගිණුමට එක්කරගැනීමට Settings ඔස්සේ Security Settings වෙත ගොස් එහි ඇති Legacy Contact වලට මරණයෙන් පසු ඔබගේ ගිණුම හිමිවිය යුතු කෙනාගේ නම ඇතුලත් කළ හැකියි..

ඉතින් ඔයාලට ඔයාලගේ සෙටින්ග්ස් ටික හද ගන්න මෙතනින් යන්න


Share:

Thursday, October 29, 2015

Download Movie Maker For Windows 10


Windows Movie Maker or Windows Live Movie Maker, was first introduced with Windows ME back in 2000. The free video editing software from Microsoft was included in Windows XP as well as Vista. Although the program was not part of Windows 7 and Windows 8, one could get it by installing Windows Live Essentials suite.

Those of you who have tried Windows Movie Maker for at least once will agree that there is no program as easy-to-use as Movie Maker for Windows operating system. Although Movie Maker offers basic editing tools, it’s good enough for most users.

Movie Maker for Windows 10


As you likely know, Movie Maker is part of Windows Live Essentials program and Microsoft hasn’t updated Live Essentials since 2012. In fact, in 2012, Microsoft discontinued the Windows Live brand for some unknown reasons.

If you upgraded your Windows 7 or Windows 8.1 installation to Windows 10 and now wondering if Live Movie Maker is compatible with the latest version of Windows, then you will be surprised to know that Movie Maker is fully compatible with Windows 10. You can install and use Movie Maker on Windows 10, just like on previous Windows versions without any issues. The popular Live Mail can also be installed on Windows 10.

Movie Maker features

With Windows Movie Maker, you can easily edit import and edit videos and slide shows, add and edit audio, edit your video by trimming, splitting or slowing it down and once done, you can upload the video to popular video sharing sites like YourTube.


Follow the given below directions to download and install Movie Maker on Windows 10. Meanwhile, if you’re relatively new to Live Movie Maker, don’t forget to check out Live Movie Maker tutorials to brush up your movie editing skills.

Please note that installing Movie Maker also installs Photo Gallery software. The Photo Gallery can be used to view and edit images.

Install Movie Maker in Windows 10

Step 1: Visit this page Windows Essentials and download the web setup file. The setup is compatible with all editions of Windows 10, both 32-bit and 64-bit systems.

Step 2: Run the setup file, click the second option titled Choose the programs you want to install, deselect all programs except Live Movie Maker, and then click Install button to begin the installation.

Once the Movie Maker is successfully installed, “Windows Essentials is installed” message will appear on the screen. You can then launch the Movie Maker by typing the same in the Start menu or taskbar search box.
Share:

Tuesday, October 27, 2015

මෙන්න නොමිලේ සල්ලී දීලා ගන්න ඕනේ SOFTWARE එකක්


ඔන්න මම අද අයෙමත් ආවේ ඔයාලට පට්ට සොෆ්ට් කෑල්ලක් හොයාගෙන. මේක ඇත්තටම $  හතළිහක් ක් වෙනවා. හැබැයි ALLSRILANKANS අද මේක ඔයාලට නිකන්ම දෙන්න යන්නේ . හොර ක්‍රැක් දාන්න නෙවේ ඔරිජිනල් ප්‍රමොසන් කෝඩ් එකක් දෙන්නයි යන්නේ . හැබැයි තව දෙයක් කියන්න ඕනේ මේක ඔයාලට ගන්න පුළුවන් නොවැම්බර් අට වෙනිදට කලින් විතරයි එක නිසා ඉක්මන් කරන්න. මෙන්න මන් පල්ලෙහා දීලා තියන ලින්ක් එකෙන් ගිහින් මුලින්ම සොෆ්ට් එක ඩවුන් කරගන්න. මේකෙන් කර ගන්න පුළුවන් දේවල් ගොඩාක් තියනවා. ඒවත් බලලම ඉන්න. එහෙනම් අපි ගියා. අලුත්ම දෙයක් සමග නැවතත් හමුවෙමු. කස්ටියටම සුභ දවසක්.

Overview of WonderFox DVD Video Converter

Want to enjoy a complete movie night with your family instead of waiting for a long time for conversion? WonderFox DVD Video Converter is your best choice. It provides one-stop total solution to rip DVDs (released by Disney, Paramount, Sony, etc), convert video, download online video, edit and play movies/video with excellent performance.

It supports the newest NVIDIA CUDA, Intel Quick Sync, multi-core CPUs, batch mode and unique encode technology, which makes the conversion speed 30-50X faster. What’s more, it adopts Variable Bite rate (VBR) which offers better quality in a smaller file size.

You can even use the DVD and video converter to easily download online video from YouTube, Facebook, Vimeo, Liveleak, Metacafe and other popular video websites. Furthermore, a DVD video player is built-in, which can be used for playing almost all kinds of audio and video files, even DVDs and HD video.

This professional program offers the best free trial and multilingual experience (English, Germany, Japanese, Spanish, and Traditional & Simplified Chinese.) - Long-time unlimited conversion without putting any watermark on output files.

More Features ........................

Backup DVD to MPG video format in 5-minute.
Support almost all encrypted DVDs released by Disney, Paramount, Sony, Universal Studios, etc.
Convert DVD to popular HD/SD video formats like MP4, AVI, WMV, MPEG, MKV, MOV, etc.
Convert DVD or normal video into portable devices like Smartphone, portable console game machine, tablets, etc.
Support batch conversion mode to save your precious time.
Extract audio from DVD or normal video and convert it to popular audio formats like MP3, AAC, WMA, etc.
Capture picture from Video and convert it to popular photo formats like jpg, bmp, etc.
Edit output video by merging, clipping, cropping, adding special effects, etc.
Enjoy 15-Minute Free Trial service without any limitation.
Play different video files with powerful built-in video player.
Backup and Convert DVD Content – Including DVDs with the Latest Encrypted Technology
Convert DVD/Video to 200+ Video Formats and Portable Devices
Online Video Downloader – Download Video from YouTube, Facebook, Vimeo, Liveleak, Metacafe, etc.
Super Fast Conversion Speed - 50X Faster than Ever Before
Video Editor - Merge, Trim, Crop and Add Special Effects to Video
Ringtone Studio - Make Your Ringtones Unique and Popular


Share:

Sunday, August 9, 2015

Everything You Need to Disable in Windows 10


Windows 10 is the most cloud-oriented version of Windows to date—yet, while this means you get some nifty new features, it also means some of your personal data is being shared with Microsoft's servers.

In all fairness to Microsoft, this type of behavior has become commonplace amongst tech companies across the world—but that doesn't mean we should sit idly by. Additionally, some of these features can cost you battery life and performance, so I'll show you how to disable them all below.

Disable Wi-Fi Sense

The first questionable Windows 10 feature I'd like to talk about is called "Wi-Fi Sense." Microsoft enabled this feature by default, and to summarize, your network passwords are now being shared with your social media friends automatically. It's a 2-way street, so the convenience factor is definitely appealing—no more asking for your friend's Wi-Fi password, and no more issues conveying your own complicated password to your friends.

Wi-Fi Sense does not share passwords automatically—while it's enabled by default (so you can access shared passwords), you have to explicitly choose what passwords to share. None are shared without you explicitly choosing to share them. But, the passwords are securely stored on Microsoft's servers and obfuscated when shared, but that's just it—it's my password, and I never wanted Microsoft to have it in the first place.

So if you'd like to disable Wi-Fi Sense, open your Start menu and launch the Settings app. From here, choose the "Network & Internet" option to begin.


 Next, click the "Manage Wi-Fi settings" option on the following page.


From here, the Wi-Fi Sense options will be displayed at the top of the screen. Basically, you want to disable every last option in this menu.


At this point, you'll no longer be participating in Microsoft's Wi-Fi sharing program, but your passwords may still be stored remotely. To disable Wi-Fi Sense altogether, you'll have to add a suffix of "_optout" to the end of your Wi-Fi network's name (SSID) through your router's settings menu.

Disable Bandwidth Sharing for Updates

In another strange act of opt-out data sharing between users, Windows now uses a sort-of peer-to-peer network for downloading updates. Similar to a torrent program, this means that when you download a Windows update file, you're also uploading parts of it to other users.

Since unnecessary bandwidth usage can be costly, you'll probably want to disable this one. Again, start by heading to the Settings menu, but this time open the "Update & Security" section.


From the "Windows Update" tab on the next screen, click the "Advanced options" button to find the setting we're looking for.


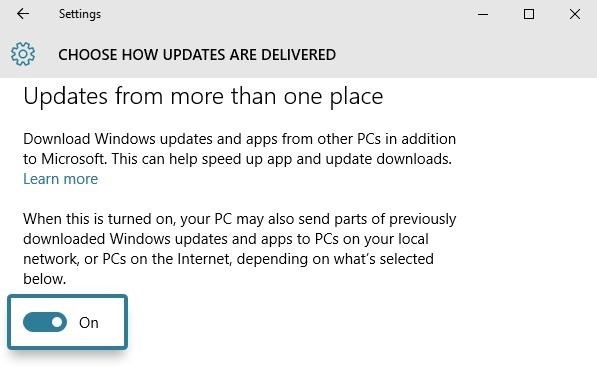
Next, scroll down to the bottom of this page, then select the option labeled "Choose how updates are delivered."

Finally, turn off the toggle switch directly beneath the excerpt about "Updates from more than one place." They really buried this one deep, didn't they?


Disable Automatically-Applied Updates

On the subject of updates, Windows 10 now automatically applies updates by default, which is a nice feature on the surface. The downside here, though, is that while they say it'll only restart your device while you're not using it, I can personally attest that this is not always true.

So if you don't want to run the risk of losing unsaved data when Windows decides it needs to update itself, head to Settings, then Update & Security, and select the "Advanced options" entry again. From here, click the drop-down menu directly beneath the "Choose how updates are installed" header.


Finally, set this option to "Notify to schedule restart." This will ensure that Windows at least gives you a warning before restarting itself to apply updates.


If you experience any issues with Windows restarting multiple times in an attempt to apply the same broken update,

Disable 'Getting to Know You' Features

Another disturbing feature that is meant to streamline your Windows 10 experience is called "Getting to know you." This one logs your typing history, saves recordings of your voice, collects information from your contacts, calendar, and even your handwriting—all in the name of giving you a more personalized experience with Cortana.

In addition to options for the "Getting to know you" feature, each of these last 4 sections will be dealing with options in Windows 10's Privacy menu—so open your Start menu and launch the Settings app, then select "Privacy" to begin.


From here, select the "Speech, inking & typing" category in the left-hand menu, then click "Stop getting to know me" to take back a bit of privacy.


Disable Targeted Ads

With Windows 10, you've now been issued a unique advertising ID to help "serve" you with more targeted ads. This ID cannot be removed permanently, but at the very least, you can prevent 3rd-party apps from accessing this data.

To begin, head to the "General" tab in Windows 10's Privacy menu. From here, make sure to disable the topmost toggle switch, labeled "Let apps use my advertising ID for experiences across apps."


Disabling this setting won't affect Windows apps like Microsoft Edge, so you may want to take this a step further. To disable targeted ads in Edge, use the browser to navigate to this link, then turn any available options off.

Prevent App-Access to Your Location, Microphone, & Webcam

In Windows 10, third-party apps can access your microphone, webcam, and location. While this makes sense for some apps—for instance, a video-chatting app needing access to your microphone and webcam—not all apps absolutely need these permissions. Additionally, apps accessing your location too frequently can lead to a reduction in performance and battery life, so you should at least familiarize yourself with these menus.

First up, head to the "Location" tab in the Privacy menu, then scroll down to the bottom of the page to review the apps that have permission to access your location. To block any of these apps from accessing your location, simply toggle the adjacent switch to "Off."


In the same vein, head to the "Camera" tab to check on apps that can access your webcam. Again, scroll down to the bottom of the list, then turn off the toggle switches next to any unnecessary apps in this list.


Finally, head to the "Microphone" tab in the Privacy menu to view apps that can access your microphone. Again, simply turn off any switches here if you don't want an app to access your microphone.


Disable Unwanted Background Apps

This last option is a bit less privacy-oriented, but it can make a big impact in terms of battery life and performance. Many "Universal" Windows apps are set to start up alongside your computer, and this is a drain on your computer's resources.

From the Privacy menu again, scroll down to the bottom of the menu on the left side of the page, then select the "Background apps" option. From here, simply use the toggle switches to prevent these apps from running on startup and staying open in the background.


Share:

අපේ ලිපි කෙලින්ම Email එකට

Enter your email address:

Delivered by FeedBurner


මුහුණ පොතේ අපි

පැමිණ ගිය අය

අපේ යාලුවෝ