" ශ්‍රී ලාංකීය අභිමානය " ශ්‍රී ලංකාවේ කොල්ලො කෙල්ලොන්ට 2023 සිරාම බ්ලොග් එක.. Blog Eka.. ப்லொக் எக.. "ALLSRILANKANS BLOG"

This is default featured slide 1 title

Go to Blogger edit html and find these sentences.Now replace these sentences with your own descriptions.

This is default featured slide 2 title

Go to Blogger edit html and find these sentences.Now replace these sentences with your own descriptions.

This is default featured slide 3 title

Go to Blogger edit html and find these sentences.Now replace these sentences with your own descriptions.

This is default featured slide 4 title

Go to Blogger edit html and find these sentences.Now replace these sentences with your own descriptions.

This is default featured slide 5 title

Go to Blogger edit html and find these sentences.Now replace these sentences with your own descriptions.

Showing posts with label Security. Show all posts

Thursday, June 22, 2017

iPhone සහ Android රහස් කේත මොකද කියන්නේ ගේමක් දෙමුද? - {iPhone & Android Secret Codes 2017}


iPhone  & Android  කැපිල   යනවා නේද? මේ දෙකේම ඔබට ගොඩක් වැදගත් වෙන codes ටිකක් තමයි අද ලිපියෙන් දෙන්නේ. ගොඩක් වෙලාවට Phone එකේ ගුණාත්මක බාවය වගේ දේවල් මේකෙන් බලන්න පුළුවන් Phone එකක් . Use කරපු එකක් ගන්නකොටට් මේවා ගොඩක් වැදගත් වෙයි කියල හිතනවා.

Cod එක සහ එකේ ක්‍රියකරිතාවය  යටින් තියෙනවා සින්හෙලෙන්ම ලොල්


iPhone Secret Codes 2015

Codes
*#06#
It will display your iPhone IMEI. It is an identifier for your mobile phone hardware.

*3001#12345#*
This code opens you field mode which contains all of iPhone inner settings, cell information, and newest work.

*#67# 
You can check the number in order to call forwarding when the iPhone is busy. And again, but for when the iPhone is busy.

*646# (Postpaid only)
It will play you available minutes.

*225# ( Postpaid only)
To check the Bill Balance

*777# 
To check the Account balance use this code for prepaid iPhone only.

 *#33#
You can check call control bars by using this code. Also for seeing whether barring is enabled or disabled for outgoing you can check all the usual suspects like fax, SMS, voice, information, etc.

*#76#
For checking connected line presentation is enabled or not you can use this code. like to the calling line presentation, you can also check whether the connected line presentation is enabled or disabled.
 
*#21#
You can set inquiry for call forwards. Find the settings for your call forwarding. You will see whether you have a fax, SMS, voice, knowledge, sync, async,  paid access &   packet access call forwarding enabled or disabled.

*3282#
It will let you know about the use of information info.

*#61#
To check a number of missed calls.

*#62#
 You can verify the number for forwarding calls If there is no service is available. 

*3370#
EFR mode Enhanced Full Rate improves your iPhone voice quality, but it will slightly reduce battery life.

*#5005*7672#
To check  SMS center.

 *331*
Barring code # Outgoing calls abroad to block the lock code to inquire about her please contact your work operator.
 
 *#43# 
Call Waiting Status.
  
*43#  
 Activate awaiting.

 #43#  
Deactivate waiting.
   
*#31#  

It allows you hide your number.


Android Codes 


ශෝක්  නේද? එනම් ඔන්න්න වැඩේ අහවරයි . අපි ගියා බයි බායී ....
Share:

Thursday, April 6, 2017

කප්පම් ඉල්ලන මෘදුකාංග – Ransomware


තොරතුරු තාක්ෂණයේ  දියුණුවත්  එක්ක ලෝකයේ  බොහෝ ක්ෂේත්‍ර පරිගණක සහ අන්තර්ජාලය තමන්ගේ වැඩ කටයුතු  සඳහා යොදාගන්න පුරුදු වුණා. අපේ වැඩ පහසු කරන මෘදුකාංග හදන මෘදුකාංග නිර්මාණකරුවන් වගේම අපරාධකරුවනුත් මේ තාක්ෂණික දියුණුව තමන්ගේ මඩිය තර කරගන්න යොදාගැනීම හරහා මෑතකදී  බිහිවුණු ප්‍රවණතාවක් ගැන තමයි අද ලිපියෙන් කතා කරන්නේ.

මෘදුකාංග කොහොමද කප්පම් ඉල්ලන්නේ?

කප්පම් ඉල්ලීම සඳහා භාවිතා කරන මෘදුකාංග විශේෂය හැඳින්වෙන්නේ ransomware කියලයි. බොහෝවිට මේවා නිර්මාණය වෙන්නේ තමන්ගේ හැකියාවන් අපරාධ සඳහා යොදාගන්න පුරුදු වුණ දක්ෂ  ක්‍රමලේඛණ ශිල්පීන් අතින්. ඔබේ පරිගණකය හෝ ස්මාර්ට් දුරකථනය තුළ  ransomware එකක් ස්ථාපනය වූ පසු එම මෘදුකාංගයට පුළුවන් ඔබේ දත්ත ඔබට පාවිච්චි කරන්න බැරි වෙන ආකාරයට ගුප්ත කේතනය (encrypt) කරන්න, නැතිනම් ඔබේ පරිගණකය හෝ දුරකථනය අගුළු දැමීම. ඊළඟට ඔබේ දත්ත නැවත විකේතනය (decrypt) කරන්න හෝ අන්ලොක් කරන්න  නම් ඔබ යම්කිසි මුදලක් අන්තර්ජාලය හරහා ගෙවිය යුතු බවට දැනුම්දීමක් මේ මෘදුකාංග මගින් සිදුවෙනවා.
Ransomware එකක් මගින් කප්පම් ඉල්ලා කෙරෙන දැනුම්දීමක් (www.cureyoursystem.com)

Ransomware වල ඉතිහාසය

Ransomware හිසරදයක් වෙන්න පටන්ගත්තේ 2005දී පමණ නමුත් ransomware වල ඉතිහාසය 80 දශකය දක්වා විහිදෙනවා. 1989 වසරේදී  AIDS Trojan නමින් හැඳින්වුණ ransomware එකක් පරිගණක වලට මුදාහැරුණත් පුද්ගලික පරිගණක ඒ වකවානුව තුළ ඉතා දුලබ වීම නිසා එය  එතරම් අවධානයට ලක් වුණේ නෑ. වසර 2005 පමණ වනවිට නැවත වතාවක් රුසියාව ආශ්‍රිතව මේ මෘදුකාංග දකින්න ලැබෙන්නේ යුක්රේනය, බෙලරුස් සහ කසකස්ථාන් වැනි රුසියාව ආසන්නයේ  රටවල් වල පිරිස් අපහසුතාවයට පත් කරමින්.
2010 පමණ වනවිට මේ ransomware අන්තර්ජාතිකව පරිගණක ආරක්ෂාව සම්බන්ධ තර්ජනයක් හැටියට හඳුනාගැනෙනවා. ගුප්ත කේතන උපක්‍රම භාවිතා කරන පළමු ransomware එක 2013 දී අන්තර්ජාලයට මුදාහැරෙනවා. කාලයත් සමග අද වනවිට ඉතා දියුණු තාක්ෂණික උපක්‍රම මගින් වඩාත් දරුණු ransomware නිපදවන්න වගේම සංවිධානාත්මක මාෆියාවක් විදියට මේ මෘදුකාංග බෙදාහැරින්නත් සයිබර් අපරාධකරුවන් පුරුදු වෙලා තියනවා. නවතම සංඛ්‍යාලේඛන වලට අනුව දිනකට ලොව පුරා පරිගණක 4000ක් පමණ ransomware වල ගොදුරු බවට පත්වෙනවා.
ransomwareවල සීඝ්‍ර වර්ධනය (source : symnatic )

Ransomware වල ප්‍රභේද 2ක් තියනවා

1- Locker Ransomware
මේ වර්ගයේ ransomware වලින්  කරන්නේ ඔබේ පරිගණකය අගුළු දමා නැවත ඔබේ පරිගණකයට පිවිසීමට අවසර ලබාදීම වෙනුවෙන් කප්පම් ඉල්ලන එක. මේ මගින් ඔබේ පරිගණකයේ දත්ත වලට බලපෑමක් නොකෙරෙන නිසා සාපේක්ෂව මේ වර්ගයේ ransomware වලින් සිදුවියහැකි හානිය අඩුයි.
2- Crypto Ransomware
මේ වර්ගයේ ransomware මගින් ඔබේ දත්ත ඔබට පාවිච්චි කරන්න බැරි ආකාරයට ගුප්ත කේතනය (encrypt) කරන නිසා මේ වර්ගයේ එකකින් ඔබේ දත්ත ආරක්ෂා කරගැනීමේ හැකියාවක් නැති තරම්.
ransomware වර්ග (www.symantec.com)

ගුප්ත කේතනය (Encryption) සහ Ransomware

ගුප්ත කේතනය කියන්නේ පරිගණක වල ආරක්ෂාව වැඩි කිරීම සඳහා පාවිච්චි කෙරෙන  තාක්ෂණයක්. අපි පරිගණක ජාලයක් හරහා යවන පණිවුඩ, නැතිනම් පරිගණකයක ගබඩා කරන තොරතුරු වෙනත් කෙනෙකුට කියවන්න බැරි වෙන විදියේ රහස් සංකේත බවට පත්කිරීම තමයි ගුප්ත කේතනය හරහා සිදුවෙන්නේ. මේ විදියට කේතනය කළ තොරතුරු විකේතනය කරන්න නම් ඒ සඳහා සැකසු ඩිජිටල් යතුරක් (digital key) අවශ්‍යයි. ගුප්ත කේතනය කළ තොරතුරු නැවත විකේතනය කරන්න හැකියාව තියෙන්නේ අදාළ යතුර තියන කෙනෙකුට පමණයි.
Crypto Ransomware මගින් කරන්නේ පරිගණකයේ දත්ත ගුප්ත කේතනය කර එම දත්ත විකේතනය කිරීම සඳහා අවශ්‍ය ඩිජිටල් යතුර ලබාදීම වෙනුවෙන් කප්පම් ඉල්ලීමයි. නවීන ගුප්ත කේතන ක්‍රම වලින් කේතනය කරන යතුරක් නැතිව විකේතනය කිරීම කළ නොහැක්කක් හැටියට තමයි සැලකෙන්නේ. උදාහරණක් හැටියට දැනට වෙබ් අඩවි සඳහා පාවිච්චි වෙන AES-128 නමැති ගුප්ත කේතන ක්‍රමය මගින් කේතනය කළ දත්ත යතුරක් නැතිව විකේතනය (bruteforce) කරන්න සුපිරි පරිගණකයකටත් (supercomputer) වසර බිලියන 13ක් පමණ ගතවන බව කියවෙනවා. ඒ නිසා Crypto Ransomware එකක ගොදුරක් වෙන කෙනෙකුට තමන්ගේ දත්ත අහිමි වෙන්න තියන ඉඩකඩ ඉතා ඉහළයි.

Ransomware පැතිරෙන්නේ කොහොමද?

ප්‍රධාන වශයෙන් මේවා පැතිරෙන්නේ ඊමේල් සමඟ එන ඇමුණුම් (attachments) හෝ ලින්ක් හරහා යි. ඔබට නාඳුනන කෙනෙකුගෙන් එන ඊමේල් එකක් සමග තියන ගොනුවක් ඔබ විවෘත කිරීමේදී ඔබේ පරිගණකයට ransomware ඇතුළු වෙන්න ඉඩ තියනවා. ඒ වගේම ඔබ සැරිසරන වෙබ් අඩවි වලත් ransomware තියෙන්න පුළුවන්. ඒ නිසා  ඔබ නිතර පාවිච්චි නොකරන වෙබ් අඩවි වලින් ඩවුන්ලෝඩ් කරන දේවල් ගැන සැලකිලිමත් ඉතා වැදගත්.

ජංගම දුරකථන සඳහා ransomware

වසර 2014 දී ඇන්ඩ්‍රොයිඩ් මෙහෙයුම් පද්ධතිය සඳහා පළමු ransomware එක වාර්තා වීමත්  පරිගණක වලට සීමා නොවී ජංගම දුරකථන වලටත් පැතිරෙන්න ransomware සමත් වෙලා තියනවා. දුරකථන සඳහා වන ransomware බොහොමයක් තියෙන්නේ නිල නොවන app store වල. ඒ වගේම සමහර ransomware ප්‍රති වයිරස මෘදුකාංග විදියට වෙස් මාරු කරගෙන ඉන්න අවස්ථාත් පසුගිය දෙවසර තුල වාර්තා වෙලා තියනවා.
ජංගම දුරකථන වලට එන කප්පම් ඉල්ලීම් (www.welivesecurity.com)

Ransomware වල බලපෑම

Ransomware වලින් වෙන්න පුළුවන් ලොකුම හානිය තමයි තමන්ගේ දත්ත අහිමි වීම. ඔබ වසර ගණනක් තිස්සේ එකතු කරගත් ඡායාරුප, නැතිනම් තමන්ගේ රැකියාවට අදාළ තොරතුරු ගොනු වගේ දේවල් ransomware නිසා ඔබට නැතිවෙන්න පුළුවන්. තනි පුද්ගලයෙකුට නම් සමහරවිට මෙහෙම දෙයක් දරාගන්න පුළුවන් නමුත් ආයතනයක කටයුතු වලට යොදාගන්නා පරිගණකයකට  මේ ඇබැද්දිය සිද්ධ වුනොත් ආයතනයට  විශාල පාඩුවක් වගේම අදාළ සේවකයාගේ කීර්තිනාමයටත් හානි සිදුවෙන්න පුළුවන්. මේ වගේ  සිදුවීම් කිහිපයක් පසුගිය වසරේ අපේ රටෙනුත් වාර්තා වෙලා තියනවා.
ඊළඟ කාරණය තමයි ransomware එක මගින් ඔබේ දත්ත සොරාගෙන තියෙන්න ඇති හැකියාව. ඔබේ පරිගණකයේ ඔබට හොරෙන් වැඩ කරන මෘදුකාංගයකට ඔබේ තොරතුරු ගොනු, ඔබ ටයිප් කරන පාස්වර්ඩ් වැනි දේවල් සොරාගෙන වෙනත් කෙනෙකුට යවන්නත්  පුළුවන්.

Ransomware එකකට අහුවුණොත් මොකද කරන්නේ?

1- හැකි ඉක්මණින් පරිගණක ජාල වලින් ඉවත් වෙන්න

ඔබේ පරිගණකය දැනටමත් ransomware එකකට අහුවෙලා නම්, ඔබේ පරිගණක ජාලයේ වෙනත් පරිගණකයකට ransomware එක ඇතුලත් කරන්න එයට හැකියාව තියෙන්න පුළුවන්. ඒ නිසා හැකි ඉක්මනින් අන්තර්ජාලය, WiFi, LAN හෝ වෙනත් ජාලගත සබඳතා වහාම නවත්වන්න.

2- පොලිසියට කියන්න

මේකෙන් ඔබේ දත්ත නැවත ලබාගන්න තියන හැකියාව අඩු ඉතා නමුත් ඔබේ පරිගණකයේ ආයතනික දත්ත වගේ දේවල් තියන අවස්ථාවකදී පොලිස් තොරතුරු තාක්ෂණ අංශයට දැනුම්දීම ඉදිරි කටයුතු වලට පහසුවක් වේවි. ඒ වගේම ආසාදනයට ලක්වුණු පරිගණකය ඔබේ සේවා ස්ථානයේ එකක් නම වහාම ඔබේ සේවා ස්ථානයේ තොරතුරු තාක්ෂණ අංශයට දැනුම් දෙන්න.

3- Ransomware එක අයින් කරගන්න බලන්න

ඔබේ පරිගණකයට අරක්ගත්ත ransomware එක ගුප්ත කේතන පාවිච්චි නොකරන එකක් නම් ඔබේ දත්ත ටික බේරගන්න හැකියාව තියෙන්න පුළුවන්. ඒ සඳහා පළමුවෙන් ඔබට ransomware එකේ නම හොයාගන්න පුළුවන් නම් වෙනත් පරිගණකයකින් අන්තර්ජාලයේ පොඩ්ඩක් හොයලා බලන්න. ඒ ransomware එකට අදාළ විකේතන මෘදුකාංගයක් තියෙන්න පුළුවන්. එහෙම හොයාගන්න නැතිනම් ඔබේ මෙහෙයුම් පද්ධතියේ තියන Safe Mode වැනි පහසුකමක් මගින් හෝ මෙහෙයුම් පද්ධතිය නැවත ස්ථාපනය කිරීම මගින් ransomware එක ඉවත් කරන්න උත්සාහ කරන්න.

4- Backup එකක් restore කරන්න

ඔබ කලින් ගත්තු backup එකක් ඔබ සතුව තියනවනම් ඒක නැවත ස්ථාපනය කරගන්න. ලඟදි කරපු වැඩ ටික ඔබට අහිමි වුණත් වෙලාවේ හැටියට හොඳම විසඳුම තමයි මේක.

5- ගෙවන්න පෙර  සිතා බලන්න

කරන්න වෙන දෙයක් නැතිම වෙලාවක ඉතුරු වෙන එකම විසඳුම තමයි කප්පම ගෙවන එක. නමුත් මේක එතරම් නුවණට හුරු වැඩක් නෙවෙයි. එහෙම කියන්න හේතු කිහිපයක් තියනවා. කප්පම් ගෙවූ පසුවත් ඔවුන් ඔබේ දත්ත නිදහස් නොකරන්න ඉඩ තියනවා. ඒ වගේම ඔබේ දත්ත ලැබුණු පසුවත් ransomware එක ඔබේ පරිගණකයේ ඉතිරි වෙලා තියනවානම් ඔබ තවමත් අනතුරින් ගැලවී නැහැ. තවත් කාරණයක් තමයි ඔබ කප්පම් ගෙවීමෙන් සිදුවෙන්නේ කප්පම්කරුවන් දිරිමත් කිරීමක්. ඒ නිසා කප්පම් නොගෙවා සිටීමට හැකි සෑම උත්සාහයක්ම ගැනීම ඉතා වැදගත්.

Ransomware වලින් බේරෙන්නේ කොහොමද?

ප්‍රති-වයිරස මෘදුකාංග වලට ransomware හඳුනාගන්න තියන හැකියාව තරමක් අඩු නිසා ඒ  පිළිබඳව අපි සැලකිලිමත් වීම අත්‍යවශ්‍යයි. පරිගණක සම්බන්ධ මේ වගේ පුරුදු ටිකක් ඔබේ ජීවිතයට එකතු කරගැනීම ransomware වගේම තවත් බොහෝ අවදානම් තත්ත්ව වලින් ගැලවීමට උදව් වේවි.
  1. පරිගණකය / දුරකථනය නිතර backup කරන්න.
  2. වටිනා ඡායාරූප, ලිපිගොනු ආදිය Google Drive හෝ DropBox වැනි සේවාවක් තුළ තබන්න.
  3. මෘදුකාංග සහ මෙහෙයුම් පද්ධතිය යාවත්කාලීන කරන්න.
  4. ප්‍රති-වයිරස මෘදුකාංගයක් පාවිච්චි කරන්න.
  5. ඔබ ඩවුන්ලෝඩ් කරන ගොනු අදාළ ප්‍රවර්ගයේමද (file type) යන්න විවෘත කිරීමට පෙර පරීක්ෂා කරන්න. උදාහරණයක් හැටියට ගීතයක mp3 ගොනුවක් වෙනුවට exe හෝ apk ගොනුවක් ඩවුන්ලෝඩ් වුණොත් නිසැකවම එය හානිකර හෝ ඔබට අනවශ්‍ය ගොනුවක්.
  6. නොදන්නා වෙබ් අඩවි වලින් ජංගම දුරකථන යෙදුම් (mobile apps) ඩවුන්ලෝඩ් කිරීමෙන් වළකින්න.
  7. Spam හෝ සැක සහිත ඊමේල් පණිවුඩවල අඩංගු ලින්ක් ක්ලික් කිරීමෙන් වලකින්න.
  8. Ad-blocker මෘදුකාංගයක් පාවිච්චි කරන්න.
අවසාන වශයෙන් තොරතුරු තාක්ෂණ ක්ෂේත්‍රයේ නියැලෙන අයට පමණක් සීමා නොවී පරිගණකයක් හෝ ස්මාර්ට් උපකරණයක් පාවිච්චි කරන සහ අන්තර්ජාලය භාවිතා කරන සියළු දෙනාම පරිගණක ආරක්ෂාව ගැන යම් දැනුමක් ලබා සිටීම තමන්ගේ ආරක්ෂාවටත්, පුද්ගලිකත්වය ආරක්ෂා කරගැනීමටත් විශාල පිටුවහලක් වෙයි. ඒ නිසා මේ දේවල් ඔබේ යහළුවන් එක්කත් බෙදාහදා ගන්නත් අමතක කරන්න එපා.
මුලාශ්‍ර: Heimdal Security, ESET Security, Business Insider
කවරයේ පින්තූරය: stinntech.com
Sources:- roar.tech
Share:

Sunday, October 23, 2016

Disable and Enable forced Windows 10 updates using command line


Disable forced Windows 10 updates using command line

Using the Command Line and running three simple commands, you can easily take control of the Windows Update process. To do so, you need to open Command Prompt with administrative permissions. If you see the User Account Control prompt, press the Yes button.

Now, type the following commands one by one, hit enter, and proceed:

net stop wuauserv
It stops the Windows Update service.

net stop bits
This command stops background intelligent transfer service.

net stop dosvc
It stops delivery optimization service.

Enabling Windows 10 updates

Just in case you wish to resume the update process, open Command Prompt with administrative privileges and run the following commands one by one:

net start wuauserc

net start bits

net start dosvc

This will resume the Windows 10 updates on your PC.
Share:

Tuesday, June 14, 2016

Basic Linux Commands


we find ourselves pondering over the Basic Linux Commands which one must be aware of, as a beginner!

ls
The ls command is used to list the contents of the directory (just in case you are getting confused: a directory can be considered as being analogous to a folder of Windows). You will be using the ls command to gain information about the files and directories.

As I mentioned above, we can add certain options to a Linux command in order to make it do a little bit of extra work. Here’s is how it happens:

cd [dir]
The ‘cd‘ command is used to change the current directory i.e we use this command to switch over to some other directory whose contents we might want to view or perform particular operations upon. It is basically used for navigation purposes. Using this command changes the current directory to ‘dir’. If you simply use the cd command without specifying the directory, it changes the current directory to the home directory.

pwd
The pwd command is used to display the name of the current working directory. In case you are unaware about it, use the pwd command to determine the directory that you are currently placed in.

cat [file]
The cat command concatenates and display files. This command is used to display the contents of the file mentioned along with the command.

echo [argument]
The echo command is one of the most commonly used Linux commands and is used to display the argument mentioned in the command on the screen. It basically displays a line of text/string on standard output or a file.

clear
Sometimes while using the Terminal, there is a tendency for things to get cluttered. There could be too much information on the screen or you might, no longer require the data being displayed. In such cases,we use the clear command to (no prizes for guessing) clear the screen and get rid of the contents of the screen.

exit
As the name suggests, the exit command is used to exit the shell or your current session.

man command
One of the Linux commands that would come to your rescue when things get sticky is the man command. The man command displays the online manual for the ‘command’ specified along with the word man. It is sort of like the help menu. You can get information about any of the command, its function, the options associated with it etc. By using the man command:

This documentation provided for any Linux command by the man command is called ‘man pages’.

Here are some more Linux commands that you should know:

rm: This command removes files and directories.

cp: This command copies files and directories.

mv: This command moves files and folders between directories.

mkdir: This command makes a new folder in your working directory.

cal: This command shows calendar on you Terminal.

nano: This command is a command line text editor.

sudo: This command gives you the super user privileges.

If you are willing to learn more about Linux command line tools related to various system processes, hardware, users, network etc. here’s a useful cheatsheet.

There are hundreds of Linux commands out there. But, I would advise you to first try out these commands on your own system and gather a basic idea of how they work. You could also refer to the man pages of each command in order to gain more knowledge about them. We shall keep discussing these commands in greater detail in upcoming articles.


Share:

Friday, May 27, 2016

How To Test Your Internet Speed With Fast.com — Simplest Internet Speed Test By Netflix


Fast.com is a simple internet connection speed test tool launched by Netflix. It tells you the real-time download speeds and gives you a link to compare your results with the famous Ookla’s Speedtest.net. Netflix says that it measures your current download speed by performing a series of downloads from Netflix servers.
Are you tired of your ISP’s deception and the slow internet connection speed? Well, you have an option of checking your connection speed and filing a complaint. To check the internet connection speeds, numerous broadband tests are available and they have their own specialties.

While many of you might be using Ookla’s Speedtest from time to time, Netflix is here with the simplest internet connection speed test ever called fast.com. They also give the option to compare your results with Ookla internet connection speed test.

As you visit the newly released service, you see a minimal interface that just measures your internet service provider’s download speed. After a few seconds of the test, the results are right in front of you in huge digits.

Unlike Ookla’s test, fast.com shows no ads and is designed by Netflix to check your download speeds if you are facing any streaming issues with your ISP.

How to take Fast.com internet connection speed test?

As I earlier said, you just need to visit Fast.com and your test automatically starts. If you want to check the internet connection speed once more, you need to hit the reload button and the test starts again.

Fast.com measures your current download speed by performing a series of downloads from Netflix servers. “This consumer speed test is different than our Netflix ISP Speed Index. Fast.com measures your personal Internet connection at any given time,” the Netflix website writes.

Earlier in May, Netflix also introduced a tool to help the users control how much data they use.

Fast.com vs Ookla Speedtest.net results:

I decided to take both Fast.com and Ookla Speedtest and there was a surprising difference between those. While Speedtest.net recorded a download speed of 40-60 Mbps, Fast.com’s result  was stuck around 10 Mbps.


Go ahead, take the both internet connection speed tests, 


Share:

Monday, May 23, 2016

The Computer Hardware Chart: Can You Identify Your PC’s Parts?


ඔන්න යාලුවනේ මම අද ආවේ ඔයලට පරිගණක දෘඩාංග පිලිබඳ පොඩි ෆොටෝ ටිකක් අරගෙන ඔයාලත් බලන්න මේවා දැකල තියනවද අඳුන ගන්න පුලුවන්ද කියල ...


Share:

Thursday, April 21, 2016

Microsoft Windows News 2016 April


Microsoft and Canonical’s latest partnership that has enabled Windows users to use Ubuntu Linux apps on Windows 10 marks the start of a new friendship. Talking about the same, Canonical founder Mark Shuttleworth says that Microsoft and Ubuntu have left their rivalry behind. We hope that it’ll make open source and FOSS movement stronger than ever.


You might not know but PowerShell, the ubiquitous force running behind the Windows environment, is slowly becoming a secure way for the attackers to hide their malicious activities. Unfortunately, at the moment, there’s no technical method of distinguishing between malicious and good PowerShell source code.
Share:

Monday, July 27, 2015

IP වෙනස් කර කර හොර වැඩ කරන්න ඕනෙම නෑ දැන්. Anonymity Online.


ඔන්න යාලුවනේ මම ආයෙමත් අවේ අලුත්ම වැඩක් හොයාගෙන. උඩ තියන ටොපික් එකේ හැටියටම. අන්තරජාලයේ මොකක් හරි හොර වැඩක් කරන්න ගියාම තමයි අපිට IP එක මතක් වෙන්නේ නේද. ඔන්න මම අද දෙන්න යන්නේ පට්ට වෙබ් අත්රික්සුවක් (WEB BROWSER) මේක මෙහෙමයි මම පල්ලෙහා දීලා තියන් ලින්ක් එකෙන් ගිහින් ඩවුන් කරගෙන මුලින්ම සෙටප් කර ගන්න. මෙයාලගේ තව සොෆ්ට් කෑලි තියනවා ඒවත් ෆලෝ කරලා බලන්නකෝ.

මේකෙදි අපි ආයේ අලුත් සොෆ්ට් දාලා IP වෙනස් කරන්න ඕනේ නෑ PROXYගානේ වේලෙන්න ඕනේ නෑ . එය ඉබේම අපේ IP එක හංගලා හොරෙක් විදියට තමයි අන්තර්ජාලයට සම්බන්ද වෙන්නේ . පට්ටයි නේ . මෙන්න තවත් විස්තර පල්ලෙහා තියනවා. එහෙනම් අපි ගියා . ආයෙමත් අලුත් එකෙකින් හමු වෙමු.


මෙන්න වැඩි විස්තර,

What is Tor?
Tor is free software and an open network that helps you defend against traffic analysis, a form of network surveillance that threatens personal freedom and privacy, confidential business activities and relationships, and state security.

Why Anonymity Matters

Tor protects you by bouncing your communications around a distributed network of relays run by volunteers all around the world: it prevents somebody watching your Internet connection from learning what sites you visit, and it prevents the sites you visit from learning your physical location.


Share:

Wednesday, January 14, 2015

Software නැතුව Folder හන්ගමුද JPG එකක "හොර වැඩ"


මුලින්ම කියන්නම් මේක වෙනත් බ්ලොග් එකකින් කොපි කරපු පොස්ට් එකක් මගේ බ්ලොග් එකේ යාලුවන්ටත් බලන්න මන් මේක ඒ විදියටම ඔයාලට දෙන්නම්. ඔරිජිනල් ලින්ක් එක පහල ලබා දී ඇත.

කොහොමද යාළුවනේ. මම අද කියල දෙන්ඩ යන දේ හැමෝටම වැදගත් වෙනවා. ඒකනම් මට හොඳටම විශ්වාසයි.. මොකද ඉතින් හැමෝටම පෞද්ගලිකත්වයක් කියල එකකුත් තියනවනේ නේද? ඇත්තටම පෞද්ගලික දේවල් හන්ගන්න ඕන තරම් ක්‍රම තියෙදිත් මේක මොකටද කියල ඔයාල බලයි.. ඒත් මට වුනු දේ අහුවම ඔයලටම තේරෙයි මේකෙ වටිනාකම. මම මුලින්ම මට වුනු සිද්දිය කියන්නම්කෝ.. මම ගියා මගේ යලුවෙක්ගෙ ගෙදර. එකා මං ගියපු ගමන්ම මට මෙහෙම කීවනේ. "අඩේ බන් අපේ අයියා මගේ files චෙක් කරනව බන් මට මේ folder එක හන්ගන්ගල දියන්කෝ" කියලා.. මට කරගන්ඩ දෙයක් නැති වුනා. මොකද ඉතින් මන් කොහෙන් software හොයන්ඩද folders හන්ගන්ඩ... නෝන්ඩි නොවී වැඩේ කරල දෙන්ඩත් ඕනිනේ.. මම ඉතින් බලමුකෝ කියල computer එක on කලා.. මගේ වෙලාවටම ඒකෙ 7zip application එක install කරල තිබ්බ. ඔයාල බලයි ඒකෙන් කොහොමද files හන්ගන්නෙ කියලා. මම එක ගත්තේ files හන්ගන්න නෙමේ folder එක compressed කරගන්ඩ. දැන් ඉතින් වැඩේ කරන විදිහ බලමුකෝ. මම එක කරපු විදිහටම ඔයාලටත් කියල දෙන්නම්. මොකද කොයි වෙලේ ඔයාට files හන්ගන්න ඕනි වෙයිද දන්නෙ නැනේ... හදිස්සියකට ප්‍රයෝජනයට ගන්න පුළුවන් හොද ක්‍රමයක් මේක. 

මම 7zip පාවිච්චි කරල folder එක compress කලා කියල ඔයලත් 7zip එකම හොයා ගන්න ඕනේ නෑ. ඔයගෙ අවස්තාවේ හැටියට computer එකේ තියන software එකකින් compress කරගන්න පුළුවන් ඔයාලට (ඒත් folder එක open කරගන්න නම් 7zip, winrar ,winzip වගේ එකක් තියන එක තමා හොද)


දැන් folder එක compress කරගන්නකෝ කැමති format එකකින්. password එකක් දානවනම් දාන්න. ඒක තවත් හොදයි folder එකේ ආරක්ෂාවට.

compressed කරපු file එකට කෙටි නමක් දාන්න. මම දානව folder කියලා.

මම compress කරල තියෙන්නේ 7zip කියන format එකෙන්. ඒ හින්ද මගේ එකේ නම folder.7z කියලයි තියෙන්නේ. ඔයගෙ එකත් ඔයගෙ විදිහට හදා ගන්න..
දැන් ඔයා ඒ compressed file එක folder එකකට දා ගන්න. මම ඒක මගේ computer එකෙ E:/ drive එකේ Hide නමින් folder එකක් හදල එකට දානවා...

දැන් ඔයා කැමති පින්තුරයක් අරගෙන ඒ folder එකට copy කරගන්න.හොදට මතක තියා ගන්න ඔයා ගන්න පින්තූරේ නමත් කෙටි වෙන්න ඕනේ. ඒ වගේම photo එකේ format එක ගැනත් ඔයා සැලකිලිමත් වෙන්න ඔනේ. මම මේකට ගන්න පින්තූරේ JPEG format එකේ එකක්.ඒ නිසා මගේ photo එකේ නම තියෙන්නේ photo.jpg කියලා. මම ඒකත් Hide කියන folder එකටම දා ගත්තා..

දැන් ඔක්කොම හරිනේ. මගේ folder එක මෙහෙමයි තියෙන්නෙ දැන්..


දැන් තියෙන්නේ file හන්ගන්නනේ. එකට command prompt එක open කරගන්න. 
(keyboard එකේ win + R ඔබපුවම RUN එක on වෙනවනේ. ඒකේ cmd කියල type කරල enter එබුවහම command prompt එක open වෙයි)

දැන් ඒකේ path එක ඔයා files දාපු folder එකට හදන්ඩ..

මම ඔය පල්ලෙහා තියන විදිහට type කරල path එක හදා ගත්තේ...

type E: and press Enter (E කියන Drive එකට යන්න)
type cd Hide and press Enter (Hide කියන Folder එකට යන්න)


දැන් මේ code එක type කරල enter කරන්න.(ඔයාගෙ විදිහට code එක වෙනස් කරගන්න හොදේ...)

copy/b photo.jpg+folder.7z final.jpg

වැඩේ හරි. දැන් ඉතින් Hide කියන folder එක ඇතුලේ final.jpg කියලා අලුත් photo එකක් හැදිල ඇති...

ඒක ඇතුලේ ඔයාගෙ files පරිස්සමට තියනවා.(දැන් පරණ file මකල දාන්න. ඒව දැන් ඔනේ නෑ.)

දැන් බලමුකෝ කොහොමද හන්ගපුව බලන්නෙ කියලා.

මුලින්ම 7zip software එක open කරගන්න.

ඒකෙන් ඔයගේ අලුත් photo එක තියන තැනට ගිහිල්ලා photo එක right click කරලා open inside කියන එක ගහන්ඩකෝ..


දැන් open වෙයි හන්ගපුව අපූරුවට....

හරි එහෙනම් මෙන්න මෙතනින් තමයි මන් මේ පොස්ට් එක ගත්තේ .,.,.
Share:

Wednesday, December 31, 2014

මුහුණ පොතේ ඕනේ කෙනෙක්ගේ හංගන් ඉන්න ෆොටෝ බලමුද - View Hidden Facebook Photos Of Anyone -


ඔන්න යාලුවනේ මම අද ආයෙමත් අවේ ඔයාලට මුහුණ පොතේ පොඩි වැඩ කෑල්ලක් හොයාගෙන. මුහුණ පොතේ ඕනේ කෙනෙක්ගේ හංගන් ඉන්න ෆොටෝ බලමුද - View Hidden Facebook Photos Of Anyone - එහෙනම් අපි වැඩේ පටන් ගමු.

මුලින්ම කියන්න ඕනේ මේක ඇවිල්ලා CHROME BASED WEB BROWSER වල වැඩ කරන Chrome-Extension එකක්. මේකෙන් පුළුවන් ඔයාලගේ යාළුවොන්ගේ වගේම ඔයාලගේ යාලුවෝ නොවන අයගෙත් මුහුණ පොතේ PROFILE PAGE එකට ගිහින් එයාගේ HIDE වෙලා තියන 4ටෝ බලන්න. මන් පල්ලෙහා දීලා තියන ලින්ක් එකෙන් ගිහින් බලන්නකෝ.


දාලා ඉවර උනාට පස්සේ මේ වගේ මැසේජ් එකක් එයි දැන් වැඩේ හරි ඕන තැනට ගිහින් අපේ Extension එක උඩ කිලික් කරන්න

මේක ACTIVATE කරගන්න එකත් හරි ලේසියි යාලුවෙක්ට මේක දාගන්න කියල එයාගේ පෙන්නන CODE එක දා ගෙන ACTIVATE  CODE එකක් GENERATE කරගන්න තියෙන්නේ. ඒ කරන විදිය පල්ලෙහා තියනවා. කව්රු යාලුවෙක්ගෙ code එකක් මටත් එවන්න ආ. මාත් තවම activate කර ගත්තේ නෑ ... එහෙනම් මන් ගිය ආයෙමත් අලුත් දෙයකින් ඉක්මනින්ම හමු වෙමු....


Share:

Monday, August 11, 2014

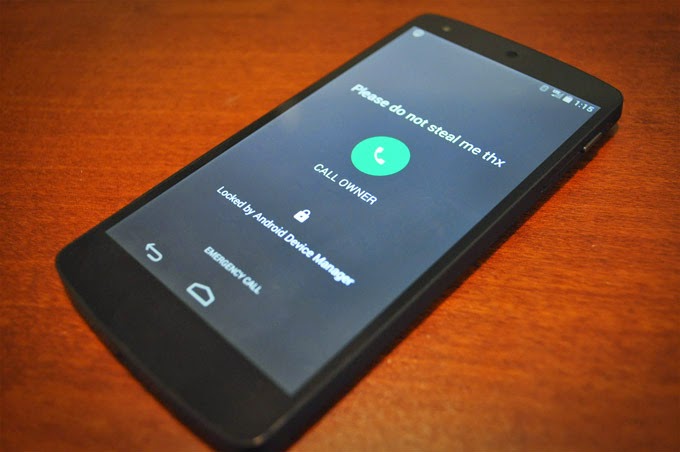
නැති වුන Android එකට ලෝකේ කොහේ තිබ්බත් Call එකක් ගමුද


ඔන්න මම ආයෙමත් ආවේ අලුත් නිව්ස් එකක් ඔයාලට හොයාගෙන. දැන් මම ගෙනාපු නිව්ස් එක ස්මාර්ට් මොබයිල් ෆෝන් පාවිච්චි කරන කට්ටියටනම් ගොඩාක් වැදගත් වෙයි. ශ්‍රී ලංකාවේ අපි ඉතින් පාවිච්චි කරන ගොඩාක් ෆෝන් වල තියෙන්නේ ANDROID OS එකනේ. ඉතින් අද මම කියන්න යන්නේ ඔයාලගේ ANDROID ෆෝන් එක නැති උනොත් ලේසියෙන්ම එක හොයා ගන්න පුළුවන් ක්‍රමයක් ඒ කියන්නේ දැන් ඔයාගේ ෆෝන් එක ලෝකේ කොහේ තිබ්බත් කෝල් එකක් අරන් හොයා ගන්න පුළුවන්. හරි දැන් අපි එහෙනම් බලමු මේක කොහොමද කරන්නේ කියලා,


If you lose your phone, just head over to Google’s browser-based Android Device Manager. Tap the lock button, toss in a “Recovery Message” (read: a plea to whoever finds the phone to not be a jerk) and an unlock password, and add a phone number where you can be reached.

හරි එහෙනම් ඔයාලා ඔයාලගේ ෆෝන් එක නැති උනොත් එහෙම ඉක්මනින්ම මං පල්ලෙහා දීලා තියන ලින්ක් එකෙන් Android Device Manager එකට යන්න. ඒකට ගියාම ඔයා ඔයාගේ ඊ මේල් එකෙන් ලොග් වෙලා තියන සේරම Android Device ටික පෙන්නනවා . දැන් ඔයාලාට හොයා ගන්න අවශ්‍ය එක තෝරලා ෆෝන් එක කොහෙද තියෙන්නේ කියලා බලාගන්න.


ආ. කියන්න අමතක උනා . ඔයාලගේ ෆෝන් එකේ Android වර්ෂන් එක 4.4 වඩා පරණයි නම් Play-Store එකට ගිහින් මෙන්න මේ ඇප් එක ඩවුන්ලෝඩ් කර ගන්න . එහෙනම් අපි ගියා ආයෙමත් ඉක්මනින්ම හමුවෙමු.

Share:

Saturday, June 29, 2013

මෙන්න ඔයාලට නොමිලේ Antivirus එකක්


හරි ඔන්න මම අයෙමත් ආවේ ඔයාලට නොමිලේ දෙයක් දීලා යන්නයි. හැබැයි එහෙම කිව්වට මමනම් නෙක නිකන් දෙන්නේ නෑ මේ සමගම තමයි ඔයාලට මේ වටිනා කියන සොෆ්ට් එක නොමිලේ දෙන්න තීරණය කරලා තියෙන්නේ. ලංකාව වගේ පුංචි රටකට ඉතින් මේ වගේ දේවල් ගොඩාක් වටිනවනේ මෙන්න පල්ලෙහා තියනවා ලින්ක් එක ඔයාලත් බාගෙනම බලන්නකෝ .....

විස්තර ටික බලාගන්න මෙතනින් යන්න

Share:

Thursday, October 18, 2012

මොකද කියන්නේ PEN DRIVE එක ඔයාගේ Machine එකේ Key එක කර ගමුද


හායි යාලුවනේ ඔන්න මම අදත් ආවා. ඔන්න ඉස්සෙල්ලම ඔයාලා හැමෝටම සුබ දවසක් ආ... හරි අදත් මම ඔයාලට ගේනවා ඔයාලට ගොඩාක් වටිනා කියන සොෆ්ට්වෙයා කට්ටක් .. මේක ඇවිල්ලා ඔයාලගේ මැසින් එකේ Security එකට තමයි හෙල්ප් එකක් දෙන්නේ අපි එහෙනම් බලමු නේද මේ මොකක්ද කියලා..

මෙන්න මේකයි යාලුවනේ ඔන්න මම අද ඔයාලට ගෙනාව සොෆ්ට් එකේ නම තමයි Rohos Logon Key. මේක ඇවිල්ලා ඔයාලට ඔයාගේ Machine එකේ Password එක වෙනුවට ඔයාගේ PEN DRIVE එක Password එකක් කරගන්න තමයි උදව් කරන්නේ. හරි ඔය පොඩි විස්තරේ ඇති. අනිත් ටික බලන්න ඔයාලා මම පල්ලෙහා දීලා තියන් ලින්ක් එකෙන් ගිහින් එයාලගේ Page එකෙන්ම බලා ගන්නකෝ. මෙන්න එහෙනම් මම මේ වැඩේ කරන විදිය පිළිවෙලට දාන්නම් ඒ විදියට කරන් ඉස්සරහට යන්නකෝ.

1. ඉස්සෙල්ලාම ඔයාලා මේ Software එක Download කරගෙන ඒක ඔයාලගේ Machine එකේ Setup කර ගන්න. එතකොට මෙන්න මේ වගේ එකක් Open වෙයි.


2. දැන් ඔයාලා අන්න එකෙන් “Setup USB Key” කියන Option ඒක තෝරාගන්න.

3. දැන් ඔයාලට මෙන්න මේ පල්ලෙහා තියනවා වගේ එකක් අලුතින් මතු වෙයි. එතන ඔයාලගේ Drive ඒක තෝරලා. ඔයාලගේ Password ඒක ගහලා. Setup USB Key කියන තැන Click කරන්න.


4. දැන් ඔයාලට ඔයාලගේ වැඩේ හරියට කර ගත්තානම් පල්ලෙහා තියනවා වගේ පික් එකක් ඒවි.


එච්චරයි. ඔන්න දැන් වැඩේ හරි. ඉතින් දැන් ඔයාලා ඔයාලගේ Machine ඒක Shutdown කරලා අයෙත් On කරලා බලන්නකෝ. හැබැයි අර Pen Drive ඒක කලින්ම ගලවලා ඉන්න. දැන් Logging Screen එකෙන් නවතීවි. ඉතින් දැන් ඔයාලා ඔයාලගේ Pen Drive ඒක ගහන්න. එතකොට ගහපු ගමන්ම ඔයාලගේ Desktop එකට ඒවි. කොහොමද වැඩේ මරු නේද. දැන් ඉතින් ඔයාලගේ ගෙදර අනිත් අයට හොරෙන් ඔයාගේ වැඩක් පාඩුවේ කර ගන්න පුළුවන් . 

මේක ඔයාලට ඕන වෙලාවක නැති කරලා දාන්නත් පුළුවන් කරන්න තියෙන්න අර සොෆ්ට් එක අයෙමත් සැරයක් Open කරගෙන  “Disbale Key” කියන තැන Click කරන්න විතරයි. හරි එහෙනම් අපි කැපුනා අයෙමත් අලුත් දෙයක් වටිනා දෙයක් සමගින් ඉක්මනින්ම හමු වෙමු.

කිසි දේකට බය වෙන්න එපා මේක ඕනෑම මෙහෙයුම් පද්දතියකට හරියනවා ආ. එ කියන්නේ. Windows XP, Vista, 7 & 8 වලත් වැඩ කරනවා.

Share:

Friday, September 21, 2012

බිල් ගේට්ගේ ජනේල වල පට්ට පට පට කෙටි මන් විස්සක්...


බිල් ගේට්ගේ ජනේල වල පට්ට පට පට කෙටි මන් විස්සක්...  හි හි කස්ටිය කොහොමද තොපික් එක මැක්සා නේ හරි හරි පොපික් එක වගේම මැක්සා Shortcut ටිකක් ගැන තමයි මම අද කියන්න යන්නේ. මේවා දන්නා අයනම් ඇති එත් මේ සේරම දන්නේ නැතුව ඇති කියලා හිතල සහ මේ ගැන නොදන්නා අයට මේ ගැන කිඉමට තමයි මම අද මේ පොස්ට් එක කරන්න හිටියේ හි හි එහෙනම් අපි බලමුද මේ මොකක් ගැනද කියන්නේ කියලා... 

කෙටි මන් එහෙමත් නැත්තම් දන්නා සිංහලෙන්ම කියනවානම් SHORTCUTs  :p ගැන කියන නිසා මම ඉස්සෙල්ලම ඔයාලට අපි එදිනදා පාවිච්චි කරන හැමෝම වගේ දන්නා පුංචිම කෙටි මන් ටික ගැනත් මතක් කරලා ඉන්නම් නැතිනම් පිළිවෙලක් නෑනේ නේද මන් අහන්නේ..

හැබැයි එකක් පුතෝ මන් මේ ටික හොයා ගත්තේ Microsoft Web Site එකෙන් ඉතින් මේ කෙටි මන් ටික ගැන තියෙන්නේ ඔයාලා හැමෝටම ගේමක් නැති කඩ්ඩෙන් . ඉතින් ඔයාලට ගේමක් නැති මට ගේමක් තියන් කඩ්ඩෙන්ම තමයි මම එඅ ටික ඔයාලට දෙන්නේ මොකද මට ඕවා වෙනස් කරන්න ගිහින්මගේ දිව උලුක් කර ගන්න ඕනේ නෑනේ නේද?????

එහෙනම් මෙන්න හැමෝම දන්න චුටිම චුටි කෙටි මන් ටික...

  • Copy a selected item: Ctrl+C
  • Cut a selected item: Ctrl+X
  • Paste a selected item: Ctrl+V
  • Undo an action: Ctrl+Z
  • Redo that thing I just undid: Ctrl+Y
  • Select everything: Ctrl+A
  • Print: Ctrl+P

මෙන්න එහෙනම් අලුත් දේවල් ටිකක් සමහර ඒවා නම් අලුත් නෑ එත් පොඩ්ඩක් කියනවට කරලා බලන්නකෝ ආසා හිතෙයි.. හි හි ආසයි නේ..,.,...,.???

  • Switch between open windows 
    Alt+Tab
    If you have lots of open windows and you're not sure exactly which one you need, press Alt+Tab, and get a quick thumbnail view of all open windows. Then, while holding down the Alt key, press the Tab key multiple times until you get to the window you want.
    Switching between windows
    Press Alt+Tab to switch between open windows
  • Clear away everything and show the desktop 
    Windows logo key Picture of the Windows logo key+D
    Use this shortcut when you want to minimize a lot of open windows at once to check something on your desktop. Clutter-to-clean with two fingers.
    A cluttered desktopA desktop before pressing Windows logo key+D
    A clean desktopThe same desktop after pressing Windows logo key+D
  • Minimize the window 
    Windows logo key Picture of the Windows logo key+Down Arrow
    Minimizing a window is a surefire way to see what's underneath it. And it's fast to use the shortcut. If the window is maximized already (covering the entire screen) it'll go to “normal” size. And if it's normal size, it'll minimize entirely.
  • Maximize the window 
    Windows logo key Picture of the Windows logo key+Up Arrow
    Maximizing windows works the same way.

Get even funkier with window management

It may surprise you to learn that there are even more options when it comes to dealing with your open windows and programs—but there are.
  • Compare and contrast in a snap 
    Windows logo key Picture of the Windows logo key+Left Arrow or Right Arrow
    Snap is the easiest way I know to compare two documents—or to write up something while also looking at a web browser. The shortcut for Snap makes it even snappier. Go ahead and try this now.
    While pressing the Windows logo key Picture of the Windows logo key, click the Right Arrow key or the Left Arrow key and your browser will slide over to one side. Select another window (such as a Word document) and use the shortcut only with the opposite arrow.
    Snap in Windows 7You can use a keyboard shortcut to view windows side-by-side with Snap
  • Multitask with multiple monitors 
    Windows logo key Picture of the Windows logo key+Shift+Right Arrow or Left Arrow
    Do you use more than one monitor at a time? Now you can shift an open window to your other monitor in less than a second.

Manage tasks

You might already be using a shortcut—Ctrl+Alt+Delete—to open up Task Manager or to lock your computer. But there are shortcuts for this shortcut.
  • Open Task Manager 
    Ctrl+Shift+Esc
    This simple shortcut whisks you straight to Task Manager—without any intermediary steps.
    Task ManagerTask Manager in Windows 7
  • Lock your PC or switch users 
    Windows logo key Picture of the Windows logo key+L
    This shortcut locks your PC and instantly displays the login screen.

Display your way

No matter how you want to view your PC, shortcuts help you get there faster.
  • Choose a presentation display mode 
    Windows logo key Picture of the Windows logo key+P
    Whether you're giving a presentation or are using multiple monitors, it's simple to switch settings.
    Choosing a presentation display modeChoosing a presentation display mode
  • Zoom in, zoom out 
    Windows logo key Picture of the Windows logo key+Plus Sign or Minus Sign
    The Plus Sign key (+) zooms you in, the Minus Sign key (-) zooms you out. This lets you see small text on a webpage or to check out the pixels in a photo.
    Magnifier in Windows 7You can use your keyboard to zoom in on a photo detail

A few last tricks

Here are a few final shortcuts. For more keyboard shortcuts, check out the complete list.
  • Search for files and folders 
    Windows logo key Picture of the Windows logo key+F
    In the past, finding a file could be like an archaeology expedition. But nowadays, search is really fast and thorough. Use this shortcut to get a search window, type in a few keywords, and presto, you’ll get your file.
  • Open a new instance of a program 
    Windows logo key Picture of the Windows logo key+Shift+Click a taskbar icon
    I like Internet Explorer tabs—but sometimes I want a whole new browser window. To get one, I just click the Internet Explorer icon while holding down Shift.
  • And when you need it...get help 
    Windows logo key Picture of the Windows logo key+F1
    It's the simplest shortcut out there. When all else fails, and you're just not sure what to do, press F1.


Share:

අපේ ලිපි කෙලින්ම Email එකට

Enter your email address:

Delivered by FeedBurner


මුහුණ පොතේ අපි

පැමිණ ගිය අය

අපේ යාලුවෝ